Migrating to Shopify often means bringing your entire order history with you. Whether you’re switching from another platform, consolidating multiple stores, or recovering from a system failure, knowing how to import orders into Shopify correctly protects your business continuity and customer relationships. One wrong field mapping or missed validation step can create inventory discrepancies, duplicate records, or broken customer order histories that take weeks to fix.
This guide walks you through every method to import orders to Shopify, from basic CSV uploads to advanced API solutions, with practical steps to avoid the most common migration pitfalls.
Summary
- Manual CSV import works best for small to medium order volumes, but requires careful field mapping and validation
- Third-party apps like Matrixify and Transporter offer automated solutions with bulk processing and error handling
- API integration provides the most control for developers migrating large order histories or connecting external systems
- Pre-migration preparation, including data cleanup, customer matching, and test imports, prevents common errors and data loss
- Post-import verification ensures order accuracy, inventory sync, and proper customer assignment before going live
Why Import Orders Into Shopify?
Understanding when and why you need to import ecommerce orders helps you choose the right migration approach and avoid unnecessary complexity.
Platform Migration Requirements
Moving from platforms like WooCommerce, Magento, or BigCommerce requires importing historical orders to maintain customer purchase records. Without this data, your customers lose access to their order history, making returns, exchanges, and warranty claims nearly impossible to process. Your Shopify migration strategy should always include a complete order transfer plan.
Business Continuity and Reporting
Historical order data feeds your analytics, inventory planning, and financial reporting. Importing past orders ensures accurate customer lifetime value calculations, seasonal trend analysis, and inventory forecasting. Companies that skip this step often discover critical reporting gaps three to six months post-migration when quarterly comparisons fail.
Customer Experience and Retention
Customers expect to see their complete purchase history when they log into your new Shopify store. Missing orders create support tickets, erode trust, and complicate warranty or subscription management. Proper order import maintains this continuity and reduces post-migration support volume by up to 40%.
Understanding Shopify Order Import Methods
Shopify offers multiple pathways for order import, each suited to different business sizes, technical capabilities, and data volumes.
| Method | Best For | Order Volume | Technical Skill | Cost |
| CSV Import | Simple migrations | Up to 5,000 orders | Low | Free |
| Migration Apps | Medium to large stores | 5,000–100,000+ orders | Low to Medium | $50–$500+ |
| API Integration | Complex data structures | Unlimited | High | Development costs |
| Manual Entry | Emergency fixes | Under 50 orders | Low | Time-intensive |
CSV File Import
The Shopify import orders CSV method works through Shopify’s native admin interface. You prepare a spreadsheet with specific column headers, validate your data structure, and upload the file through your store’s settings. This approach handles standard order fields like customer information, line items, shipping addresses, and payment status without requiring additional tools.
However, CSV imports have limitations. Complex order attributes, custom fields, or orders with multiple fulfillment locations require careful formatting. The system processes files sequentially, making large imports time-consuming.
Third-Party Migration Apps
Apps like Matrixify, Transporter, and Rewind provide automated solutions for the Shopify order import process. These tools handle field mapping, data validation, and error reporting automatically. They also support batch processing, letting you import orders in segments to avoid system timeouts or data corruption.
Most migration apps charge based on order volume or offer subscription pricing. They’re worth the investment when importing more than 5,000 orders or dealing with complex product catalogs that require variant mapping.
API-Based Solutions
Developers can import orders into Shopify using the REST Admin API or GraphQL. This method offers complete control over data structure, custom field mapping, and integration with external systems. Professional Shopify integration services handle these technical complexities. API imports work best for businesses with technical resources or those connecting legacy systems that don’t export standard CSV formats.
The API approach requires authentication setup, rate limit management, and error handling logic. For custom import solutions tailored to your specific requirements, consider Shopify app development services. Most businesses hire developers or agencies for this work unless they have in-house technical teams.
Preparing Your Order Data for Import
Data preparation determines whether your import succeeds or creates weeks of cleanup work. Taking time to structure and validate your data prevents the most common import failures.
Required Order Fields
Shopify requires specific fields for every order record. Your CSV or import file must include customer email, order date, line item SKU or product title, quantity, price, and shipping address. Missing any required field triggers validation errors that stop the import process.
Optional fields like tax amounts, discount codes, fulfillment status, and order tags provide additional context but aren’t mandatory for import. Include these when available to maintain complete records.
Data Cleanup and Validation
Clean your export file before attempting import. Remove duplicate orders, fix formatting inconsistencies in phone numbers and addresses, and standardize date formats to match Shopify’s requirements (YYYY-MM-DD). Use Excel or Google Sheets to find and replace common issues like extra spaces, special characters, or currency symbols in price fields.
Create a validation checklist that includes checking for blank required fields, verifying SKU matches between your old and new catalogs, and confirming customer emails are properly formatted. Running these checks catches 80% of import errors before they happen.
Matching Products and Variants
Your imported orders must reference products that already exist in your Shopify catalog. Before importing orders, ensure all products are created with correct SKUs. When your old system used different SKU conventions, create a mapping spreadsheet that translates old SKUs to new ones.
For variant products, verify that size, color, and other option values match exactly. A product listed as “Medium” in your old system but “M” in Shopify creates order line items that won’t link to inventory properly.
Understanding Shopify’s product structure helps avoid these mismatches during preparation.
How To Import Orders Into Shopify Using CSV
The CSV method remains the most accessible option for merchants handling moderate order volumes without technical resources.
Step 1: Export Orders From Your Current Platform
Most ecommerce platforms include native export functionality in their admin panels. Navigate to your orders section, select the date range covering all orders you want to migrate, and choose CSV as your export format. Download the file and save it with a clear name like “orders_export_2024.csv” for easy reference.
If your platform doesn’t offer direct export, look for third-party export tools or contact platform support. Some systems require you to export orders in batches to avoid server timeouts.
Step 2: Format Your CSV According to Shopify Standards
Open your exported CSV and compare its column headers to Shopify’s required format. Shopify expects specific header names like “Name” for order numbers, “Email” for customer email addresses, and “Lineitem quantity” for product quantities. Rename columns to match these exact requirements.
| Your System | Shopify Required |
| Order ID | Name |
| Customer Email | |
| Product SKU | Lineitem sku |
| Item Qty | Lineitem quantity |
Add any missing required columns and populate them with appropriate data. If certain fields don’t exist in your export, leave them blank only if Shopify marks them as optional.
Step 3: Upload and Validate
Log in to your Shopify admin, navigate to Settings > Store, then scroll to Import. Select your prepared CSV file and click Upload. Shopify processes the file and displays a validation report showing any errors or warnings.
Review each error carefully. Common issues include invalid email formats, future order dates, or SKUs that don’t match existing products. Fix errors in your CSV file and re-upload until validation passes completely.
Step 4: Monitor Import Progress
For files under 1,000 orders, import completes within minutes. Larger files can take several hours. Shopify sends an email notification when the process finishes. Don’t make changes to products or settings during active imports to avoid data conflicts.
Check your orders admin page once complete to verify the import created records correctly. Look for proper customer assignment, accurate line items, and correct order totals.
Using Apps To Import Orders Shopify
Migration apps simplify complex imports and provide features that CSV uploads can’t match, making them essential for larger or more intricate migrations.
Top Shopify Order Import Apps
- Matrixify handles bulk operations, including order imports with advanced field mapping and automatic data validation. It supports custom fields, metafields, and complex product structures. Pricing starts at $20 monthly for smaller stores and scales based on usage.
- Transporter specializes in platform migrations, automatically converting order data from formats used by WooCommerce, Magento, and other systems into Shopify-compatible structures. It includes customer account migration and order history linking. One-time migration costs typically range from $99 to $499, depending on data volume.
- Rewind offers backup and restore functionality with order import capabilities built in. While primarily a backup solution, its import tools excel at recovering or migrating order data with complete accuracy. Monthly subscriptions start at $3 and scale with store size.
Setting Up App-Based Import
Install your chosen app from the Shopify App Store and grant necessary permissions to read and write order data. Most apps include setup wizards that walk you through connecting your data source, whether that’s a CSV file, another platform’s API, or a backup file.
Configure field mappings within the app interface. These tools typically auto-detect common fields and suggest matches, but review each mapping to ensure accuracy. Pay special attention to customer matching logic, as this determines whether orders attach to existing customer accounts or create new ones.
Running Test Imports
Before importing thousands of orders, run a test with 10 to 20 sample records covering different order types. Include orders with multiple line items, orders with discounts, and orders from repeat customers. This reveals mapping issues, data type conflicts, or missing information before they affect your entire dataset.
Review test orders in your Shopify admin for accuracy. Check that products, customers, shipping addresses, and order totals match your source data exactly. Fix any discrepancies in your mapping or source data before proceeding with the full import.
When managing multiple sales channels, understanding Shopify’s multichannel order processing ensures your imported orders integrate properly with existing workflows.
API Method for Advanced Order Import
Technical teams often choose API integration for maximum flexibility and control over the import process, especially when dealing with custom requirements or ongoing synchronization needs.
Setting Up API Access
Generate API credentials through your Shopify admin by creating a private app or a custom app, depending on your store setup. These credentials include an API key and password that authenticate your import scripts. Secure these credentials carefully, as they grant full access to your store data.
Install a REST client or use programming libraries like Python’s Shopify-API or Node.js Shopify-API-Node to interact with Shopify’s endpoints. The Orders API endpoint accepts POST requests containing order JSON objects structured according to Shopify’s schema.
Structuring API Requests
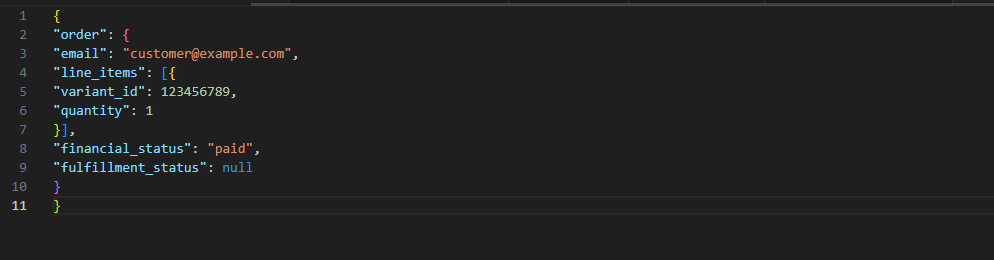
Each order requires a properly formatted JSON payload containing all order details. The minimum structure includes customer information, line items with variant IDs or SKUs, financial status, and fulfillment status. Optional fields like tags, notes, and custom attributes provide additional context.
API rate limits by implementing throttling in your import script. Shopify allows two requests per second for most plans. Exceeding this triggers temporary blocks that slow your import significantly.
Error Handling and Logging
Build comprehensive error logging into your import script. Capture the full API response for failed requests, including error messages and the specific order data that triggered the failure. This information speeds up troubleshooting when issues arise.
Implement retry logic for transient failures like network timeouts but fail permanently for validation errors that require data correction. Maintain a separate log of successfully imported orders with their new Shopify order IDs for reconciliation purposes.
Common Issues When Importing Orders and Solutions
Even with careful preparation, certain challenges appear frequently during order imports. Recognizing and addressing these quickly minimizes disruption.
Customer Account Matching Failures
Orders fail to link to existing customer accounts when email addresses don’t match exactly. Extra spaces, different cases (uppercase vs lowercase), or alternate email addresses prevent automatic linking. This creates duplicate customer records and splits order history.
Solution: Standardize email addresses in your import file before uploading. Convert all emails to lowercase and trim whitespace. For customers with multiple email addresses in your old system, choose one primary email and use it consistently across all orders.
SKU Mismatches and Missing Products
Import processes reference SKUs to link order line items with your product catalog. When SKUs in your import file don’t match any existing products, those line items import as unlinked items or the entire order fails validation.
Solution: Complete product import before importing orders. Run a comparison between SKUs in your order file and SKUs in your Shopify catalog. Create missing products or update SKUs to match before proceeding. Maintaining proper Shopify inventory tracking prevents these mismatches.
Date Format Errors
Shopify expects dates in ISO 8601 format (YYYY-MM-DD HH:MM:SS). Orders exported from other systems often use regional date formats like DD/MM/YYYY or MM-DD-YYYY. These format differences cause validation failures or import orders with incorrect dates.
Solution: Use Excel or Google Sheets formulas to convert dates to Shopify’s required format before import. The formula =TEXT(A1,”YYYY-MM-DD HH:MM:SS”) converts most date formats correctly. Verify that imported dates match your source data after conversion.
Fulfillment Status Conflicts
Importing orders with fulfillment statuses that don’t reflect actual inventory can trigger automatic fulfillment processes or create stock discrepancies. Orders marked as “fulfilled” when inventory was never actually deducted cause reporting problems down the line.
Solution: Import all orders with null or unfulfilled status initially. After verifying the import, update fulfillment statuses manually or through bulk update tools for orders that were genuinely fulfilled in your previous system. This two-step approach prevents automated processes from mishandling imported data.
Export Shopify Orders for Backup
While importing orders into your store, understanding how to export Shopify orders ensures you can back up data or migrate again if needed.
Native Export Functionality
Shopify’s admin includes built-in export options under Orders. Select the date range, order status, or specific order tags you want to export. Choose CSV as your format, and Shopify generates a file matching its import structure, making future re-imports straightforward.
Regular exports create recovery points if data corruption occurs or if you need to analyze order patterns offline. Schedule monthly exports and store them securely off-platform.
Automated Backup Solutions
Apps like Rewind and Backupify automatically export your orders on daily schedules, storing copies in cloud storage services. These solutions provide point-in-time recovery, letting you restore order data from any previous date if issues arise.
Automated backups cost between $3 and $50 monthly, depending on your order volume, but eliminate the manual work of remembering to export data regularly. They’re essential for stores processing significant order volumes.
Post-Import Verification and Quality Checks
Completing your import doesn’t mean the job is finished. Thorough verification catches issues before they impact operations or customer experience.
Order Count Reconciliation
Compare the total number of orders in your import file against the number of orders now showing in Shopify. These numbers should match exactly. Discrepancies indicate failed imports, duplicate prevention logic removing intentional duplicates, or validation errors that weren’t properly addressed.
Run order reports filtered by import date to isolate newly imported orders. Check that order numbers, customer counts, and total revenue match your source system’s reports for the same period.
Customer Account Verification
Spot-check customer accounts to verify their complete order history appears correctly. Select customers with multiple orders across different date ranges and confirm all orders show in their account timeline. Missing orders indicate customer matching issues that need correction.
Pay special attention to customers who existed in Shopify before the import. Their new imported orders should integrate seamlessly with any orders they placed directly in Shopify, creating one unified history.
Financial and Inventory Accuracy
Verify that order totals, tax amounts, and payment statuses imported correctly. Discrepancies here affect financial reporting and tax calculations. Run a report comparing imported order values against your source system’s financial data.
Check inventory levels to ensure the import didn’t trigger unintended stock adjustments. Orders marked as fulfilled should have corresponding inventory reductions, while unfulfilled orders should leave inventory untouched unless you configured automatic allocation.
Best Practices for Successful Order Import
Following proven practices reduces errors and ensures your import creates a solid foundation for ongoing operations.
Start With a Test Store
Never import directly into your live production store without testing first. Create a Shopify development store (free through Partner account) and run your complete import process there. This lets you identify and fix issues without risking customer-facing data. Working with a Shopify web design company during migration ensures professional implementation and thorough testing.
Test stores also provide a safe environment to experiment with different import methods, field mappings, or app configurations until you find the approach that works best for your specific data structure.
Import in Phases
Rather than importing years of orders in one massive batch, break your import into phases. Start with the most recent six to twelve months of orders, verify everything imports correctly, then proceed with older historical data. This approach limits the damage if something goes wrong and makes troubleshooting easier.
Phased imports also reduce server load and prevent timeout errors that plague large single imports. Most stores find monthly or quarterly batches strike the right balance between efficiency and manageability.
Document Your Process
Create detailed documentation of every step in your import process, including field mappings, data transformations, app settings, and API configurations. This documentation becomes invaluable when troubleshooting issues, training team members, or performing future imports from other sources.
Include screenshots of app settings, sample data rows before and after transformation, and notes about any decisions made during edge cases. Future you will appreciate this thoroughness.
Maintain Customer Communication
Let your customers know you’re migrating platforms and that you’re preserving their complete order history. This proactive communication prevents confusion if they notice temporary changes or if any issues arise during the transition.
Some merchants send follow-up emails after migration, asking customers to verify their order history appears correctly. This crowdsourced quality check catches edge cases your team might miss.
Understanding broader Shopify store setup best practices ensures your order import aligns with your overall store configuration.
Key Takeaways
- Choose your import method based on order volume and technical resources, with CSV handling smaller migrations and apps or APIs better for complex or large-scale imports
- Prepare data thoroughly before import by cleaning duplicates, standardizing formats, and ensuring SKUs match your product catalog exactly
- Always run test imports in development stores to identify mapping issues, validation errors, or data conflicts before touching production data
- Verify imported orders through count reconciliation, customer account checks, and financial accuracy reviews to catch issues early
- Document your complete import process and maintain regular export backups to protect against future data loss or migration needs
Conclusion
Learning how to import orders into Shopify successfully protects your business continuity while maintaining the customer experience your buyers expect. Whether you choose simple CSV uploads for straightforward migrations or leverage apps and APIs for complex data structures, proper preparation and validation ensure your order history transfers completely and accurately.
The migration process requires attention to detail, but the payoff—complete historical data, seamless customer experiences, and accurate reporting makes it essential for any platform transition. For complete migration guidance, learn how to transfer your Shopify domain as part of the process. Ready to migrate your store? Talk to our Shopify migration experts to ensure your order import goes smoothly.
FAQs
Can You Import Orders Into Shopify After Store Setup?
Yes, Shopify allows order imports at any time after initial store setup. You can add historical orders weeks, months, or years after launching your store. The process remains identical whether you import during setup or later.
How Long Does It Take To Import Orders Into Shopify?
Import time depends on order volume and method used. CSV imports under 1,000 orders typically complete within 10 minutes, while files with 10,000+ orders can take several hours. App-based imports usually process faster due to optimized batch handling.
Do Imported Orders Affect Inventory Levels?
Imported orders marked as fulfilled automatically deduct from inventory if you configure that behavior. Unfulfilled orders don’t affect stock levels unless you enable inventory allocation. Review your inventory settings before importing to prevent unexpected stock changes.
Can I Import Orders Without Customer Information?
Shopify requires minimal customer data (email address) for each order. You can import orders with guest customer records by providing placeholder or generic emails, though this limits future customer marketing and order management capabilities.
What Happens If My Order Import Fails?
Failed imports don’t create partial records in Shopify. The system rolls back incomplete imports, leaving your store unchanged. Review the error report, fix issues in your source file, and re-upload. Test imports help identify failure points before processing full datasets.
How Do I Handle Refunded Orders During Import?
Import refunded orders as completed orders first, then process refunds separately after import completes. Most import methods don’t support refund status directly. Mark these orders with tags like “refunded-legacy” for tracking purposes and manual refund processing if needed.
Can I Import Orders From Multiple Platforms Simultaneously?
Yes, but process each platform’s data separately to avoid conflicts. Import orders from one platform, verify success, then proceed with the next. Mixing data from multiple sources in one import file increases error risk significantly and complicates troubleshooting.
Will Imported Orders Trigger Notification Emails?
Shopify doesn’t send customer notification emails for imported historical orders by default. This prevents confusing customers with notifications about old purchases. Configure notification settings before import if you need different behavior for specific use cases.