Your customers may spend most of their time following up on invoices. It could be hectic for e-Commerce merchants to keep track of all the information. It is also crucial to use the adaptable method to facilitate payments, gather customer data, and share it with team members.
Many countries are supported by Stripe’s online payment infrastructure, which allows merchants to accept payments via bank transfers, credit cards, and debit cards from any web browser or mobile device.
Stripe Salesforce Commerce Cloud connection securely sending and receiving recurring payments and sophisticated billing statements is possible. With Salesforce Commerce Cloud implementation, businesses can keep a close eye on their data and use it to make wise decisions.
Let’s dive into Salesforce Commerce Cloud Integration with Stripe and how this connection can benefit e-Commerce merchants.
Benefits of Stripe Salesforce Commerce Cloud Integration
Comparing Stripe and Salesforce, here are some advantages of Stripe Salesforce Commerce Cloud:
- Businesses can now make sales from Salesforce Commerce Cloud and charge them to Stripe accounts simultaneously.
- Businesses can automate their monthly payments with Stripe and Salesforce B2B Commerce Integration, and their customer’s information will be recognized automatically.
- It allows for a unified, editable view of all client information and could be a lifesaver for Salesforce Commerce Cloud migration.
- The integration solution permits your business to access all Stripe payments (bank accounts, credit cards, debit cards.) in salesforce commerce cloud development as your data.
- With Stripe and Salesforce B2B Commerce integration, you can easily manage a subscription and coupon model, making your marketing process more engaging.
- Stripe is WebHook-compatible and provides businesses with assistance in implementing real-time solutions.
- With Stripe and Salesforce Commerce Cloud support, businesses can increase revenues and acceptance rates.
Step-by-Step Guide to Stripe Salesforce Commerce Cloud Integration
The features and capabilities of Stripe and Salesforce Commerce Cloud Optimization are distinct. Therefore, there are numerous strategies for combining them. If the two systems will work together, the integration of Stripe Salesforce Commerce Cloud needs to be smooth.
According to the Salesforce commerce cloud consultant, you can connect Stripe with Salesforce Commerce Cloud development using AppExchange apps or third-party applications (APIs), or work with a Shopify consulting company for cross-platform expertise.
Set Up A Business Manager
Several cartridges are needed for the Stripe Connector for Salesforce B2C Commerce (LINK Cartridge) to function properly. In addition, the cartridges for the controller and SFRA are split up. That’s why one can be installed and used independently of the other.
Connect a Server in UX Studio after importing all three cartridges.
Site Cartridge Assignment
- To manage your sites, go to Administration > Sites > Manage Sites.
- Select the domain of the storefront where you’d want to install Stripe integration.
- Choose the Settings sub-menu.
- The SFRA cartridge path should include
app_stripe_sfra:int_stripe_sfra:int_stripe_core
Follow these instructions again for each online shop you want to connect to your Stripe account.
Business Manager Cartridge Assignment
- Choose Administration > Sites > Manage Sites from the menu.
- A menu will appear; select Business Manager Site and Manage the Business Manager Site.
- Add the following to the cartridge path
int_stripe_core
Aiming for a Metadata Import
- Go to the metadata folder of the project and click on the stripe site template folder.
- Go to the sites folder, and here you can edit the siteIDHere folder to the site ID of the store you want.
- Incorporate a new folder for each site that will use Stripe.
- Go to Administration > Site Development and access the Site Import & Export.
- Create a zip file containing the stripe site template folder and open it.
Set Up Stripe Styling
If necessary, edit package.json from the same folder to reflect the correct location of your SFRA installation’s starting point.
The SFRA basic cartridge’s repository and any necessary plugins, libraries, and other LINK cartridges are typically cloned into a root project folder. To avoid updating the paths.base property, simply clone the Stripe cartridge into that folder as well. In package.json, modify the paths.base field with the relative path to the local directory holding the Storefront Reference Architecture repository if you haven’t already done so after cloning the cartridge there. The standard value of paths.base is as shown below:
“paths”:{“base”:”../storefront-reference-architecture/cartridges/app_storefront_base/”}
To ensure that package.json’s SFRA cartridges path is correct, you may run npm run compile:scss in the Stripe repository’s root folder.
Add New Payment Processors.
The Stripe cartridge utilizes two separate payment gateways. STRIPE CREDIT processes credit card transactions, while STRIPE APM manages local payment options, including giropay and bank transfers.
Stripe Credit Processor
- To add a new payment processor, go to Merchant Tools > Ordering > Payment Processors and click New.
- Change the ID to STRIPE CREDIT in the new window and press Apply.
Stripe APM Processor
- To add a new payment processor, go to Merchant Tools > Ordering > Payment Processors and click New.
- In the newly opened window, enter STRIPE APM as the value for the ID property, and then click the Apply button.
Update Payment Modes
To add STRIPE CREDIT as a payment processor for your CREDIT CARD payment method, go to Merchant Tools > Ordering > Payment Methods, click the CREDIT CARD payment method, and then click the STRIPE CREDIT from the dropdown arrow next to the CREDIT CARD information section.
Turn on STRIPE APM METHODS to add Stripe-supported payment methods to automatic payment methods or the Payment Request Button.
Enabling the STRIPE PAYMENT REQUEST BTN method will allow you to use the Stripe Payment Request Button.
Configurations
- Add site-specific values by updating Merchant Tools > Site Preferences > Custom Site Preferences > Stripe Configurations.
- Stripe secret API key.
- Stripe publishable API key.
- If the current site uses SFRA, set SFRA installation to Yes.
- Capture Funds on Stripe Charge: This is a true value by default (Yes). Instead of using other payment methods, set this to false (No) to allow payments to be made using Stripe.
- Stripes Card Element CSS style: Align the button on the card element’s inherited CSS with the rest of the storefront’s design. For instance:
{“base”: {“fontFamily”: “Arial, sans-serif”,”fontSize”: “14px”,”color”: “#C1C7CD”},”invalid”: {“color”: “red” } }).
- Stripe API URL: https://js.stripe.com/v3/
- Stripe Payment Request Button Style: Choose the constrained CSS styling for the payment request button.
- Apple Pay Verification String: Using the Stripe Control Panel, enter the Apple verification code shown there. You’ll only need to do this once. During setup, the Stripe interface acts as a proxy, exchanging an Apple Pay verification string for a web verification string. If you plan on accepting payments through the Payment Request Button, set this up in the Sandbox first.
- Country Code (Stripe Payment Request Button): For the Payment Request Button, this is the country code by default (USA, for instance). On a single site that serves multiple countries, you may need to make some changes so that the country code is passed along instead of the site’s default setting. Read the information on making a payment request.
- Stripe webhook signing secret: Stripe will prompt you to enter the signing secret for your webhook. Stripe verifies webhook events with a signature and sends the verification to SFCC. SFCC checks the message’s accuracy against this secret.
- Stripe Allowed Webhook Statuses: Adjust the webhook’s allows status configuration.

- Approved apm Techniques: List of accepted Stripe API payment types: Default:
{ “default”: [ “p24”, “eps”, “sepa_debit”, “ideal”, “sofort”, “bitcoin”, “alipay”, “bancontact”, “giropay” ], “en_UK”: [ “p24”, “eps” ], “de_AT”: [ “sofort”, “ideal” ] }
By updating this box, indicate which supplementary payment options are available in each language version of your site. To learn more, check out the references.
- Stripe Enabled: Turns the cartridge on or off.
Activate the Apple Pay Domain And the Webhook Endpoint
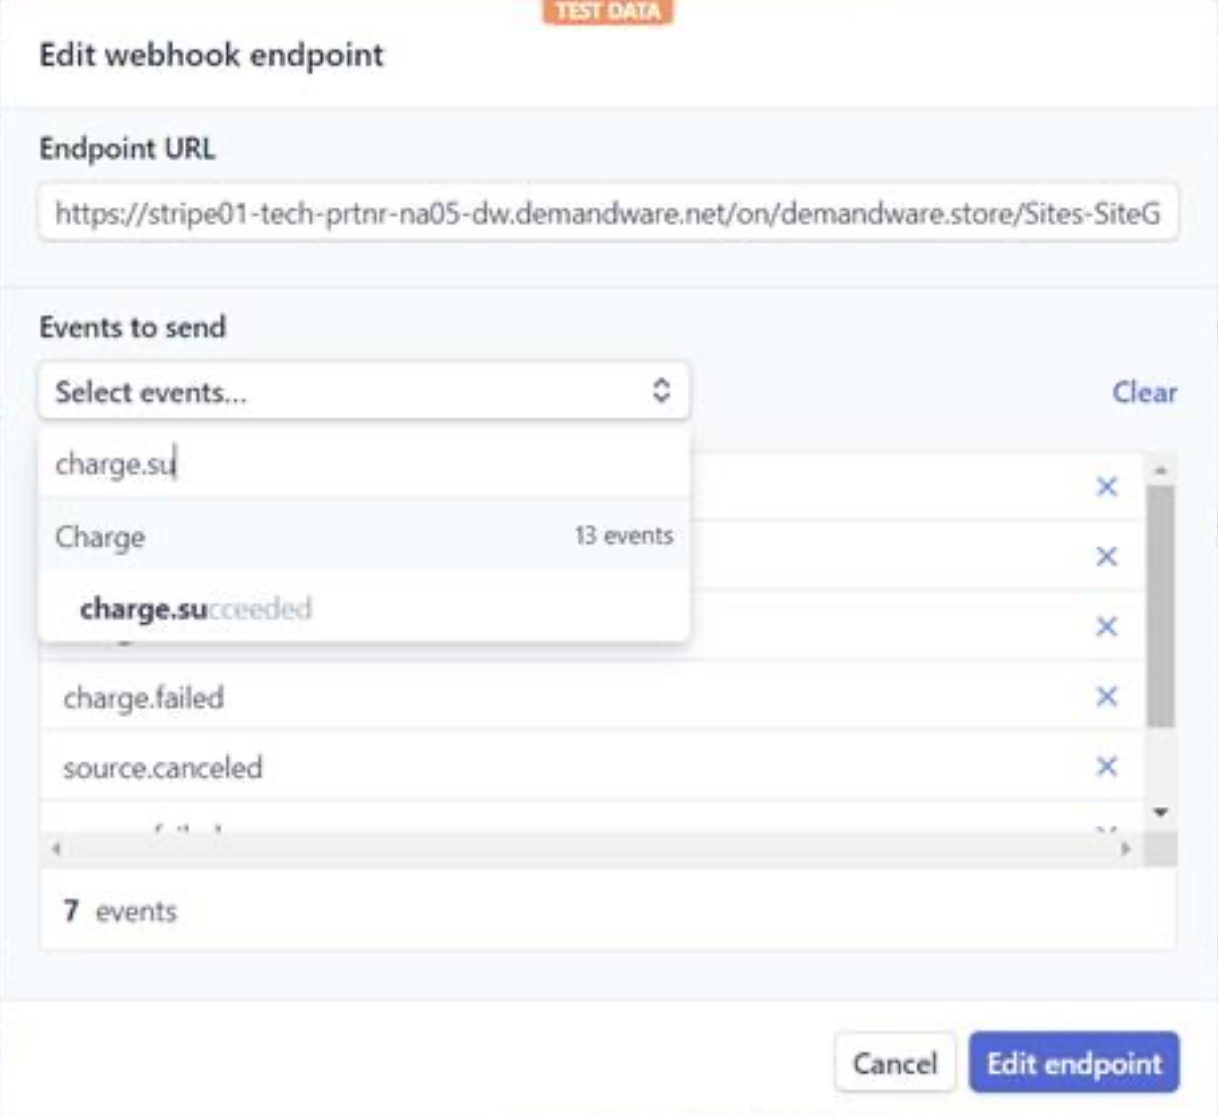
Add a new endpoint to your Stripe account using the Stripe-WebHook controller URL, and then subscribe to the following events:
- review.opened
- review.closed
- charge.succeeded
- source.canceled
- source.failed
- source.chargeable
- payment_intent.succeeded
- payment_intent.payment_failed
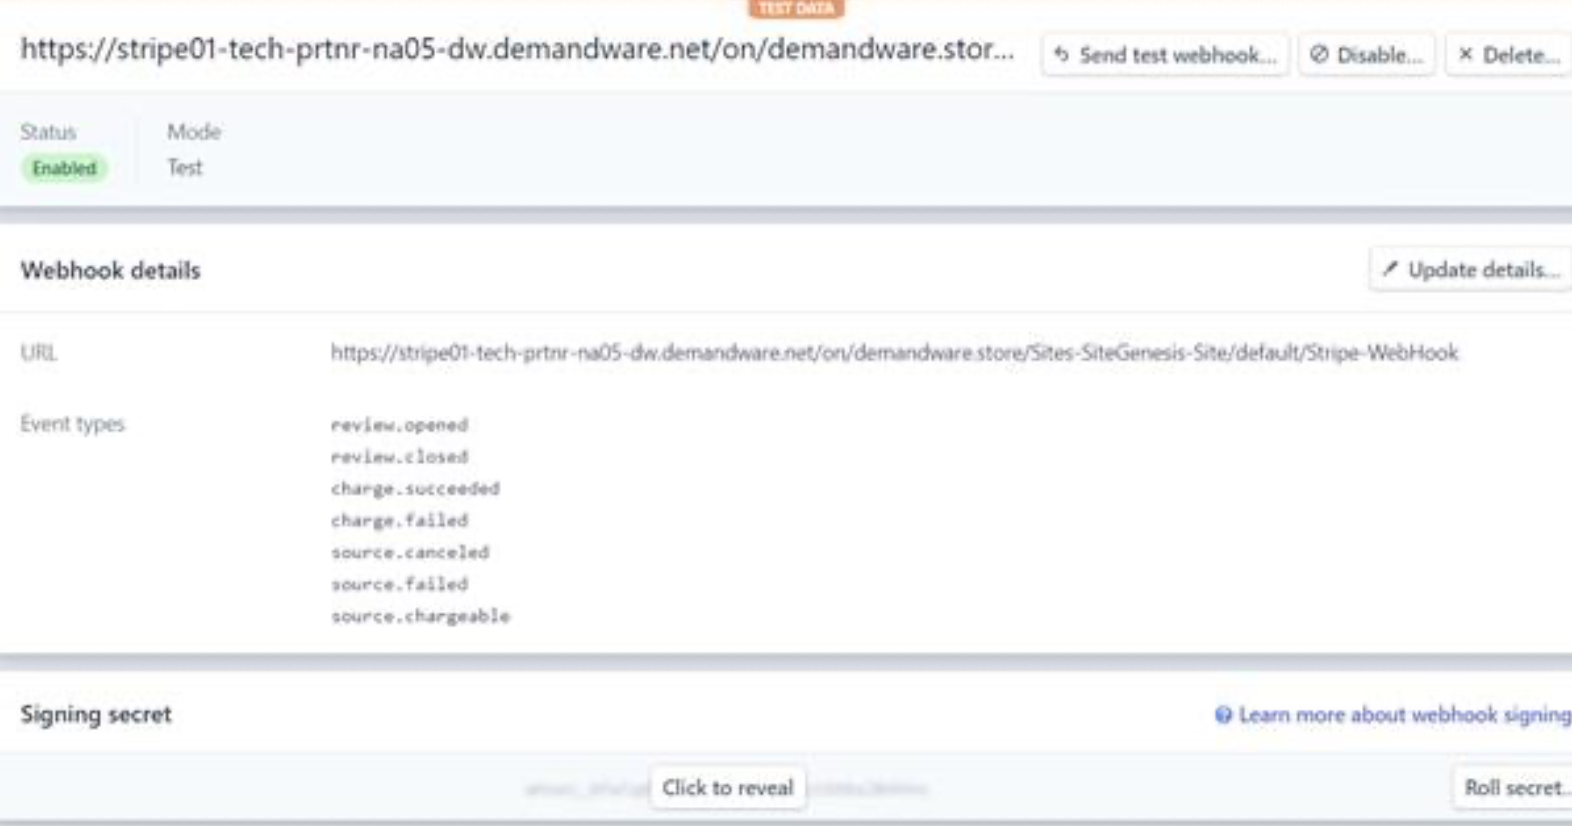
Make a duplicate of the signing secret and paste it into the Stripe Webhook Signing Secret setting. Set this to the country code associated with your Stripe account.
For Apple Pay, update RedirectURL.js:
server.extend(page);
server.replace(‘Start’, function (req, res, next) {
const URLRedirectMgr = require(‘dw/web/URLRedirectMgr’);
// Intercept the incoming path request
if (URLRedirectMgr.getRedirectOrigin() === ‘/.well-known/apple-developer-merchantid-domain-association’) {
res.render(‘stripe/util/apple’);
return next();
}
const redirect = URLRedirectMgr.redirect;
const location = redirect ? redirect.location : null;
const redirectStatus = redirect ? redirect.getStatus() : null;
if (!location) {
res.setStatusCode(404);
res.render(‘error/notFound’);
} else {
if (redirectStatus) {
res.setRedirectStatus(redirectStatus);
}
res.redirect(location);
}
return next();
});
To verify your domain in the Stripe Dashboard, you’ll need to provide a temporary alias to one of the sandbox sites. The pseudonym should look like this:
{
“__version”: “1”,
“settings”: {
“http-host”: “your.sandbox.domain.demandware.net”,
“https-host”: “your.sandbox.domain.demandware.net”,
“default”: “true”,
“site-path”: “/”,
},
“your.sandbox.domain.demandware.net”: [
{
“locale”: “en_GB”,
“if-site-path”: “/”,
}
]
}
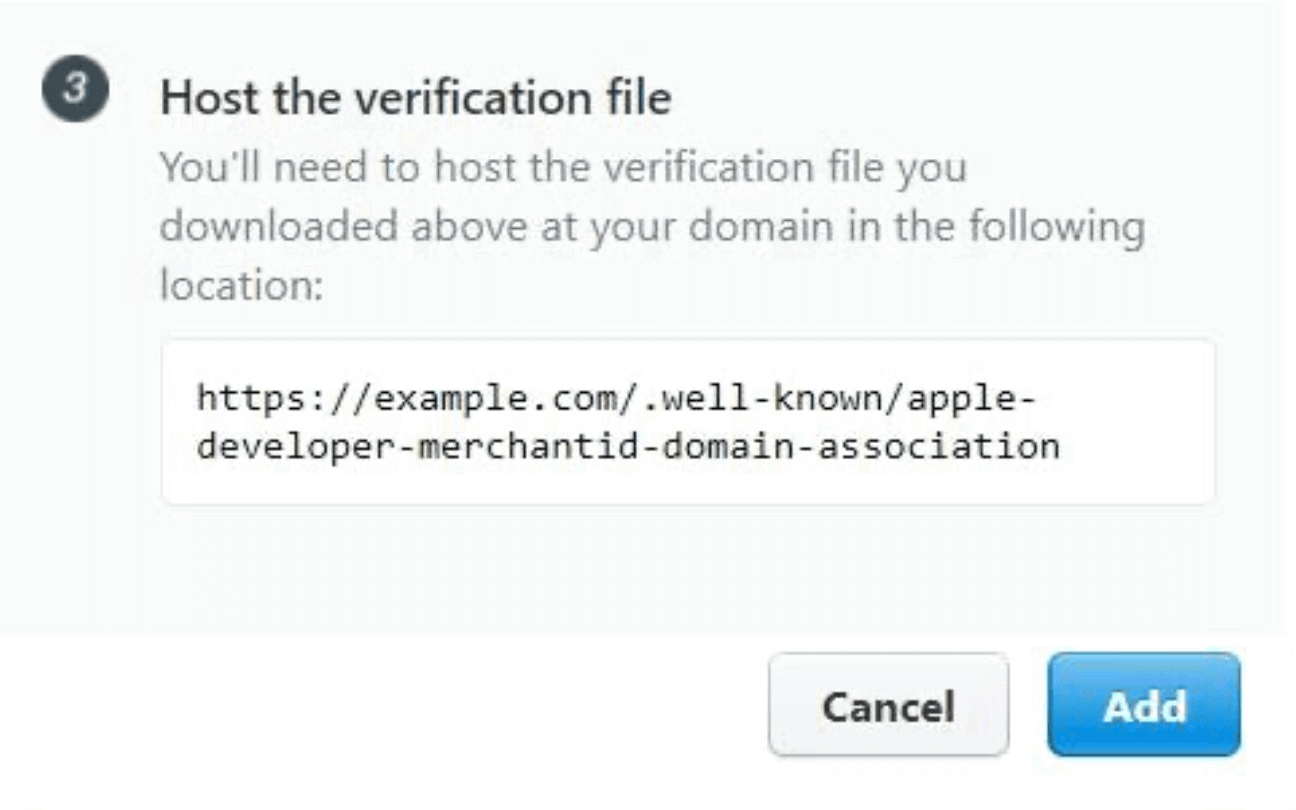
The value of the locale must correspond to a locale that is not disabled. If you want to set up a new domain for use with Apple Pay, you can do so from the Stripe dashboard by selecting the appropriate option. Get the verification file by entering the domain name here:
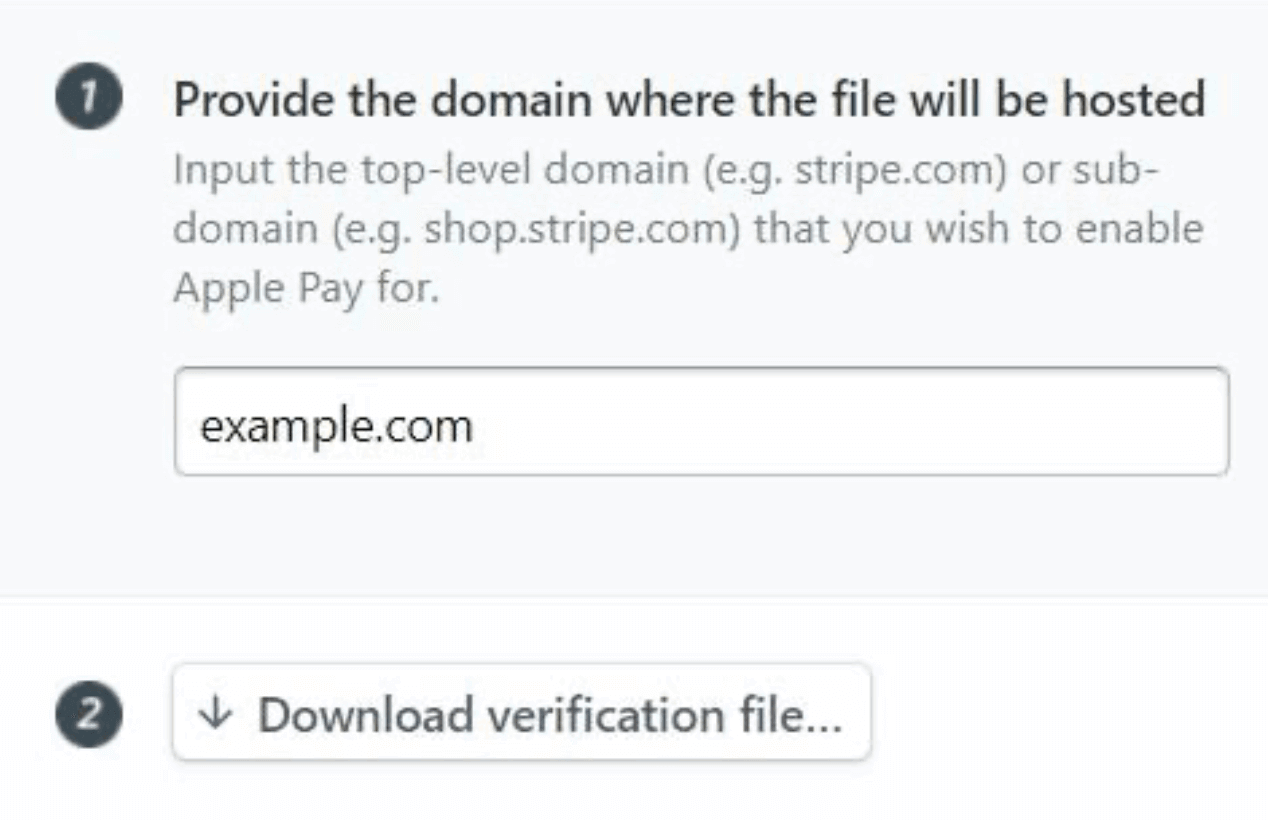
A copy of the file’s contents should be pasted into the ApplePay Verification String option.

Now press Add button:
Update the Storefront Code
The base LINK cartridge code supports all credit cards accepted by Stripe. The Credit/Debit Cards list in Business Manager (Merchant Tools > Ordering > Payment Methods > Credit/Debit Cards) continues to set a limit on the cards that can be used on the storefront.
The Storefront Code needs the following modifications. The examples are built on SFRA version 4.4. The modifications made to the SFRA code are described in the sections that follow.
Many controller endpoints are appends rather than replacements. These are not covered since they ought to function automatically.
Only replaced endpoints require controller changes because you might have already changed that endpoint as part of your integration. Use the base cartridge’s modifications and incorporate them into your already-replaced controller. You don’t need to take any action if you haven’t expanded or replaced these endpoints.
CheckoutServices.js Controller
- Path: app_stripe_sfra/cartridge/controllers/CheckoutServices.js
- Remove the SubmitPayment endpoint’s payment instrument validation.
if (!paymentMethodID && currentBasket.totalGrossPrice.value > 0) {
const noPaymentMethod = {};
noPaymentMethod[billingData.paymentMethod.htmlName] = Resource.msg(
‘error.no.selected.payment.method’,
‘payment’,
null
);
delete billingData.paymentInformation;
res.json({
form: billingForm,
fieldErrors: [noPaymentMethod],
serverErrors: [],
error: true
});
return;
}
// Validate payment instrument
const creditCardPaymentMethod = PaymentMgr.getPaymentMethod(PaymentInstrument.METHOD_CREDIT_CARD);
const paymentCard = PaymentMgr.getPaymentCard(billingData.paymentInformation.cardType.value);
const applicablePaymentCards = creditCardPaymentMethod.getApplicablePaymentCards(
req.currentCustomer.raw,
req.geolocation.countryCode,
null
);
if (!applicablePaymentCards.contains(paymentCard)) {
// Invalid payment instrument
const invalidPaymentMethod = Resource.msg(‘error.payment.not.valid’, ‘checkout’, null);
delete billingData.paymentInformation;
res.json({
form: billingForm,
fieldErrors: [],
serverErrors: [invalidPaymentMethod],
error: true
});
return;
}
A code update for the order creation:
// Re-calculate the payments
const calculatedPaymentTransactionTotal = COHelpers.calculatePaymentTransaction(currentBasket);
if (calculatedPaymentTransactionTotal.error) {
res.json({
error: true,
errorMessage: Resource.msg(‘error.technical’, ‘checkout’, null);
});
return next();
}
const stripeCheckoutHelper = require(‘int_stripe_core’).getCheckoutHelper();
const order = stripeCheckoutHelper.createOrder(currentBasket);
if (!order) {
res.json({
error: true,
errorMessage: Resource.msg(‘error.technical’, ‘checkout’, null);
});
return next();
}
Revise the order placement code:
var isAPMOrder = stripeCheckoutHelper.isAPMORder(order);
if (!isAPMOrder) {
var stripePaymentInstrument = stripeCheckoutHelper.getStripePaymentInstrument(order);
if (stripePaymentInstrument && order.custom.stripeIsPaymentIntentInReview) {
res.json({
error: false,
orderID: order.orderNo,
orderToken: order.orderToken,
continueUrl: URLUtils.url(‘Order-Confirm’).toString()
});
return next();
}
// Places the order
var placeOrderResult = COHelpers.placeOrder(order, fraudDetectionStatus);
if(placeOrderResult.error) {
stripeCheckoutHelper.refundCharge(order);
res.json({
error: true,
errorMessage: Resource.msg(‘error.technical’, ‘checkout’, null)
});
const fraudDetectionStatus = hooksHelper(
‘app.fraud.detection’,
‘fraudDetection’,
currentBasket,
require(‘*/cartridge/scripts/hooks/fraudDetection’).fraudDetection
);
if (fraudDetectionStatus.status === ‘fail’) {
Transaction.wrap(function () {
OrderMgr.failOrder(order);
});
// Fraud detection failed
req.session.privacyCache.set(‘fraudDetectionStatus’, true);
res.json({
error: true,
cartError: true,
redirectUrl: URLUtils.url(‘Error-ErrorCode’, ‘err’, fraudDetectionStatus.errorCode).toString(),
errorMessage: Resource.msg(‘error.technical’, ‘checkout’, null);
});
return next();
}
COHelpers.sendConfirmationEmail(order, req.locale.id);
// Reset usingMultiShip after successful Order placement
req.session.privacyCache.set(‘usingMultiShip’, false);
res.json({
error: false,
orderID: order.orderNo,
orderToken: order.orderToken,
continueUrl: URLUtils.url(‘Order-Confirm’).toString()
});
return next();
}
Controller: PaymentInstruments.js
Path: app_stripe_sfra/cartridge/controllers/PaymentInstruments.js
DeletePayment endpoint should be substituted with the given code:
server.replace(‘DeletePayment’, function(req, res, next) {
var stripeHelper = require (‘int_stripe_core’).getStripeHelper();
var wallet = stripeHelper.getStripeWallet(customer);
var UUID = req.querystring.UUID;
wallet.removePaymentInstrument({ custom: { stripeId: UUID }});
res.json({ UUID: UUID });
next();
});
Controller: RedirectURL.js
Path: app_stripe_sfra/cartridge/controllers/RedirectURL.js
Copy the following code and insert it into the Start function:
server.replace(‘Start’, function (req, res, next) {
const URLRedirectMgr = require(‘dw/web/URLRedirectMgr’);
// Intercept the incoming path request
if (URLRedirectMgr.getRedirectOrigin() === ‘/.well-known/apple-developer-merchantid-domain-association’) {
res.render(‘stripe/util/apple’);
return next();
}
const redirect = URLRedirectMgr.redirect;
const location = redirect ? redirect.location : null;
const redirectStatus = redirect ? redirect.getStatus() : null;
if (!location) {
res.setStatusCode(404);
res.render(‘error/notFound’);
} else {
if (redirectStatus) {
res.setRedirectStatus(redirectStatus);
}
res.redirect(location);
}
return next();
});
External Interfaces
External calls to Stripe services are crucial to Stripe functionality. The service framework is used by all external interfaces to interact with the Stripe API.
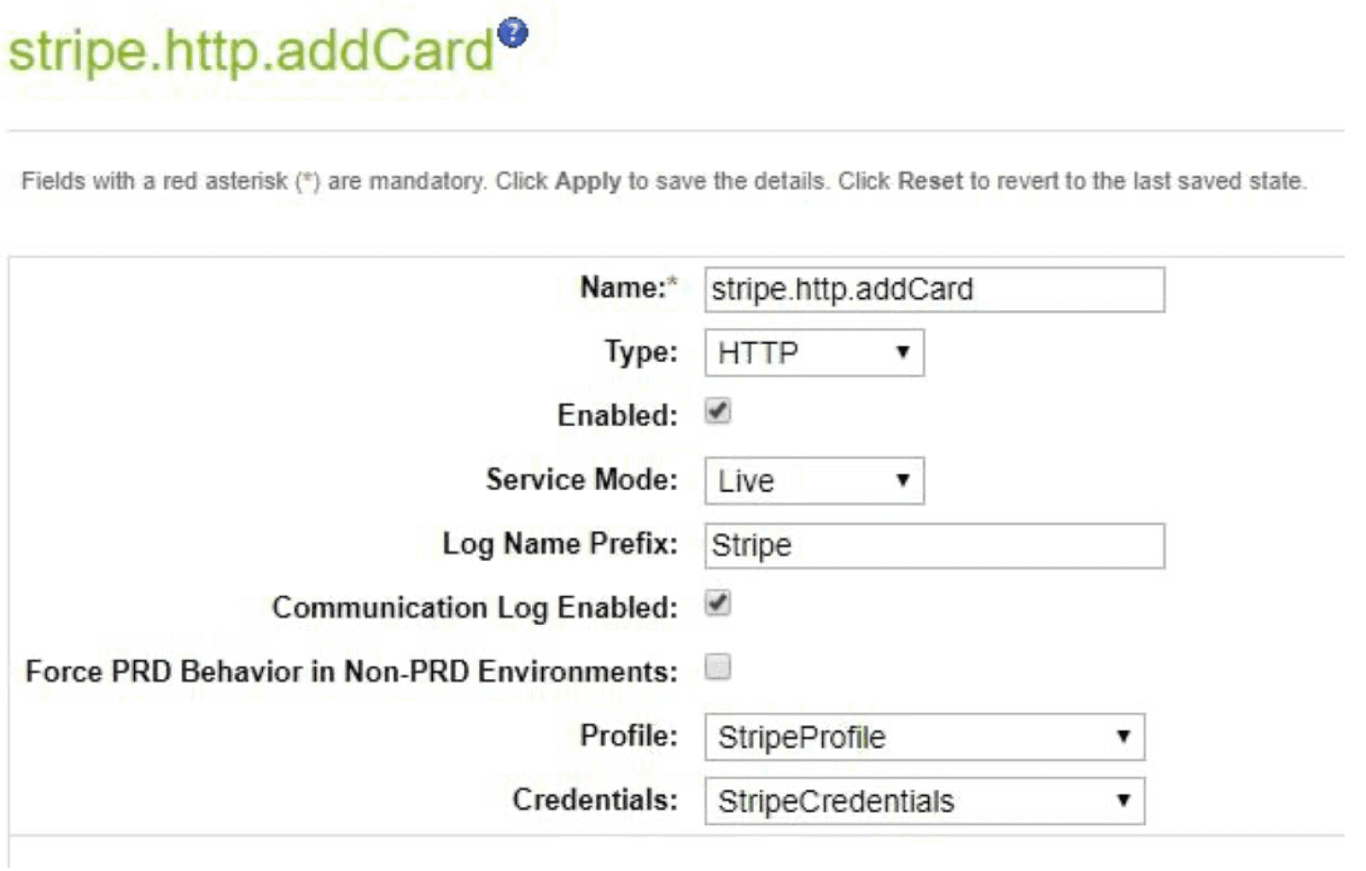
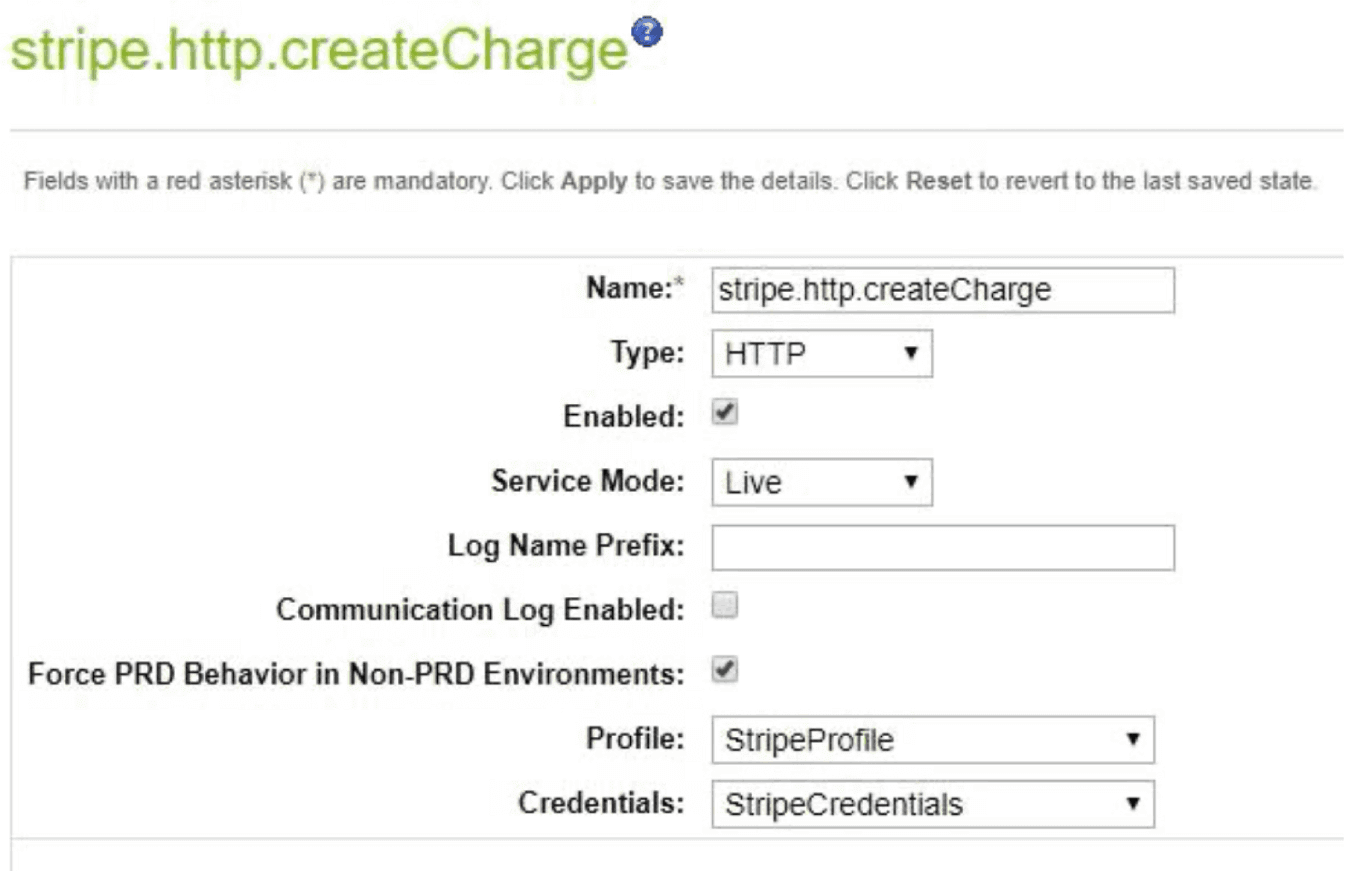
Create and utilize a Stripe account are both free. The Stripe Dashboard keeps track of and makes most communications with Stripe services available. We urge you to test and monitor your integration using the Stripe Dashboard. Under Administration > Operations > Services, with a different service for each external call, is where you’ll find the key setup for integrating the Stripe services:
- stripe.http.addCard
- stripe.http.authorizePayment
- stripe.http.createCharge
- stripe.http.createCustomer
- stripe.http.deleteCard
- stripe.http.fetchCustomerCards
- stripe.http.fetchCustomerSources
- stripe.http.refundCharge
- stripe.http.retrieveCustomer
- stripe.http.service
- stripe.http.updateCard
The credentials and profile information for all these services are shared. The only possible variation is the log name prefix and whether or not the communication log is enabled. Some of the service configurations are listed below:
Stripe Payment Element
You can use the Stripe Payment Element with the Stripe cartridge to make purchases.
You may easily take payments from a wide variety of customers by including the Payment Element into your existing user interface.
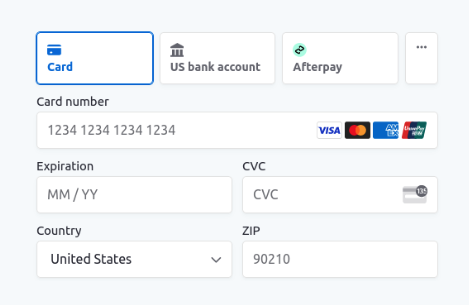
The Payment Element can be activated by navigating to Business Manager > Merchant Tools > Ordering > Payment Methods, then enabling the payment method with ID STRIPE PAYMENT ELEMENT. You may find a widget listing all accepted payment methods on your Stripe Dashboard under your store’s Checkout > Payment section.
Whenever Payment Element is activated in Business Manager, it can be used in place of any other accepted payment type. Rather than utilizing the standard collection of payment gateways, you can turn them all off and replace them with STRIPE PAYMENT ELEMENT.
Business Manager > Custom Preferences > Stripe Configs is where you’ll go to enable the saving of payment methods for future use from Stripe Payment Element. Set the option to “Enable Save Payment Method for Future Purchases“ to Yes.
Go to the Business Manager > Payments Methods to show a drop-down menu of previously used payment options; here, you can enable the CREDIT CARD payment method. When STRIPE PAYMENT ELEMENT is activated, the credit card settings page will display a list of previously stored payment methods (if any).
Stripe Radar insights display
The Stripe LINK cartridge’s Radar insights feature in Business Manager’s Orders area displays risk insights. Radar is a zero-downtime anti-fraud solution that works in real time. Radar for Fraud Teams is an optional add-on that provides more customization options and context for protecting against and investigating fraud.
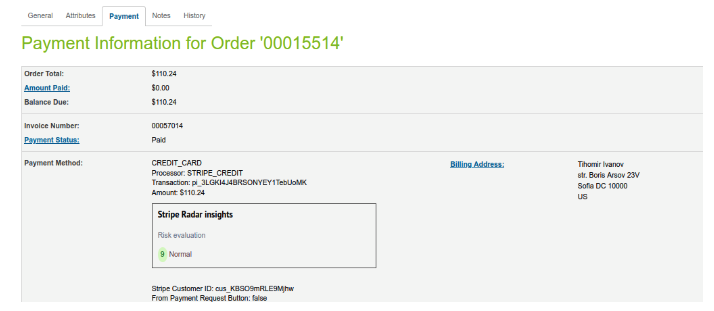
If you want to enable the insight display, go to the Business Manager > Merchant Tools > Custom Preferences > Stripe’s configurations and click yes on Risk Score Data.

Conclusion
With the help of Stripe Salesforce Commerce Cloud integration, businesses can benefit from the streamlined management of their sales and financial information.
It includes online credit card payments and more. Salesforce Commerce Cloud implementation with Stripe provides an instantaneous snapshot of your client’s financial data for your entire team.
Salesforce Commerce Cloud support is a top customer relationship management system, while Stripe is a robust SaaS-based all-in-one payment solution.
Payment processing, subscription administration, on-demand marketplace development, and crowdfunding portal creation are simplified with Stripe and Salesforce B2C Commerce Cloud integration. A Salesforce Commerce Cloud consultant can help you if you are not a computer person.