Running an online store means regularly checking whether your platform still supports your business goals. If you are using Lightspeed and running into limits with customization, app integrations, or long term scalability, many retailers choose to migrate lightspeed to shopify as a practical next step.
Shopify powers over 4.12 million active stores worldwide and offers flexible theme options, more than 8,000 apps, and built in tools for marketing, SEO, and multi channel selling. The platform scales smoothly from early stage brands to large enterprises, making it a strong fit for growth focused retailers.
This guide walks through every stage of the move from Lightspeed to Shopify, covering technical steps, data mapping, and optimization best practices. The goal is to protect customer data, maintain SEO performance, and set up your store for stable long term growth.

Summary
Migrating from Lightspeed to Shopify unlocks advanced features, better scalability, and enhanced customization for your e-commerce store. This guide covers the complete Lightspeed to Shopify migration process, from initial data preparation to post-migration optimization. You’ll learn how to export products, customers, and orders from Lightspeed, map data correctly for Shopify, preserve SEO rankings with 301 redirects, and avoid common migration pitfalls. Whether you choose automated tools, CSV import methods, or professional migration services, this comprehensive resource provides actionable steps to ensure your store migration succeeds without data loss or downtime.
Why Businesses Migrate From Lightspeed to Shopify
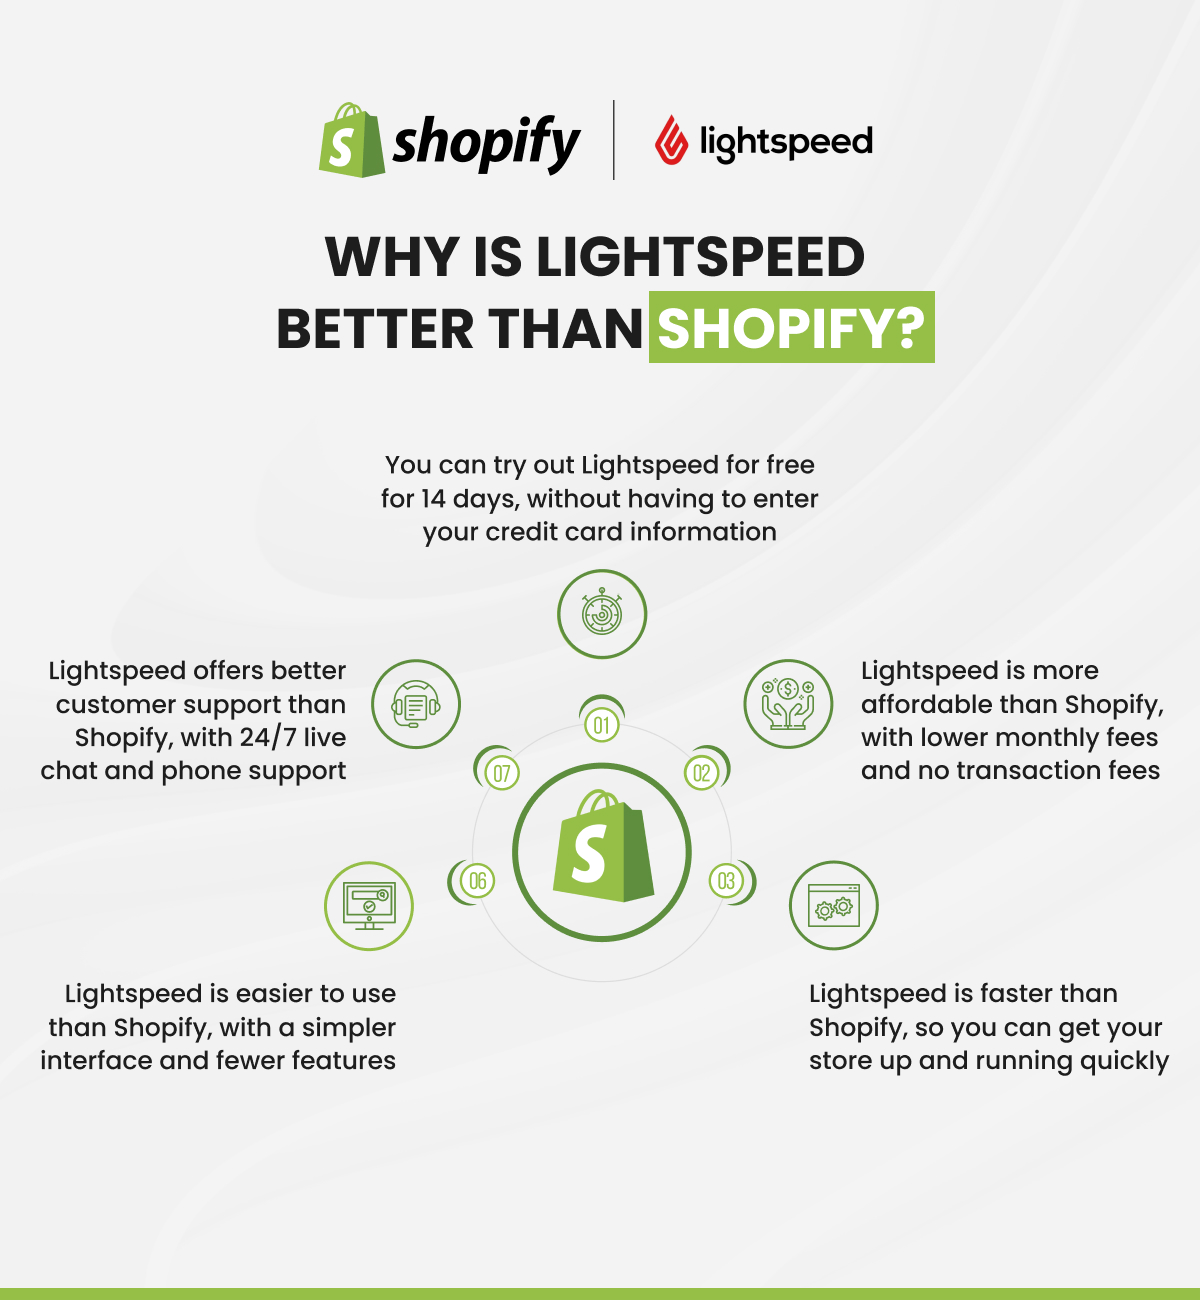
Lightspeed provides solid POS functionality, but Shopify delivers superior e-commerce capabilities. Key advantages include 150+ customizable themes versus Lightspeed’s limited selection, access to 8,000+ apps for extended functionality, automatic traffic scaling through cloud infrastructure, and support for 100+ payment gateways including fee-free Shopify Payments. These features enable better brand customization, operational efficiency, and customer experience that directly impact conversion rates and revenue growth.
Pre-Migration Planning: Essential Preparation Steps
Thorough preparation prevents data loss and reduces migration complications. Follow these steps before beginning your Lightspeed to Shopify migration.
Step 1: Audit Your Current Store Data
Document what data exists in your Lightspeed store:
Product Information
- Product names, descriptions, and SKUs
- Pricing (regular and sale prices)
- Inventory quantities across locations
- Product variants (size, color, material)
- Product images and alt text
- SEO metadata (meta titles, meta descriptions)
- Product categories and tags
Customer Data
- Customer names and email addresses
- Billing and shipping addresses
- Purchase history and order values
- Customer groups or segments
- Account creation dates
Order History
- Order numbers and dates
- Order statuses (fulfilled, pending, cancelled)
- Product details per order
- Payment information
- Shipping addresses and methods
- Tax calculations
Content and SEO Assets
- Blog posts and pages
- URL structures for products and categories
- 301 redirects already in place
- Image libraries
Step 2: Create Your Shopify Store Account
Sign up for Shopify and select the plan that matches your business size. Shopify offers a free trial period, allowing you to explore the platform before committing to migration. During this trial, you can begin setting up your store structure.
Initial Store Setup Tasks:
- Configure your store name and contact information
- Set your store’s currency and timezone
- Add your business address for tax calculations
- Install essential apps for migration support
Step 3: Choose Your Migration Method
Three primary methods exist for migrating from Lightspeed to Shopify:
Manual Migration
Copy and paste data from Lightspeed into Shopify. This method works for very small stores (under 50 products) but becomes impractical at scale due to time requirements and error risk.
CSV File Import
Export data from Lightspeed as CSV files, then import to Shopify. This approach offers more control than manual entry but requires careful formatting to match Shopify’s data structure requirements.
Third-Party Migration Apps
Apps like Cart2Cart, LitExtension, and EZ Importer automate data transfer, reducing manual work and minimizing errors. These tools handle data mapping automatically but may charge based on the number of records migrated.
Professional Migration Services
Expert migration teams handle the entire process, from data export to post-migration testing. This option costs more but ensures accuracy and includes technical support.
How to Export Data From Lightspeed
Export processes vary by Lightspeed version. For all versions, you’ll export products, customers, and orders as CSV files.
Product Export Steps
- X-Series: Navigate to Catalog > Products > Export list
- E-Series: Go to Catalog > Products > Import or Export Products > Export all > Download CSV
- R-Series: Access Inventory > Item Search > Export
Save all files as LightspeedProductExport.csv.
Customer and Order Exports
Follow similar navigation patterns in each version:
- Customers: Found under Customers or Sales sections
- Orders: Located in Sell, My Sales, or Sales history sections
Important for R-Series: Order exports may require third-party migration tools like EZ Importer or LitExtension for full functionality.
Preparing Your Data for Shopify Import
Raw exports from Lightspeed rarely work directly in Shopify. You must format data to match Shopify’s requirements.
Editing Product Data for Shopify
- Download Shopify’s product CSV template
- Open your LightspeedProductExport.csv file
- Create a new tab in your spreadsheet
- Copy Shopify’s column headers into this new tab
- Map your Lightspeed data to Shopify columns
Critical Data Mapping for Products:
| Lightspeed Field (X-Series) | Shopify Field | Action Required |
| handle | Handle | Verify format matches Shopify requirements (lowercase, hyphens only) |
| Name | Title | Copy directly |
| description | Body (HTML) | Copy HTML description |
| supplier_name | Vendor | Copy vendor information |
| product_category | Product Category | Map to Shopify’s standard taxonomy |
| tags | Tags | Copy comma-separated tags |
| variant_option_one_name | Option1 Name | Map variant type (Size, Color, etc.) |
| variant_option_one_value | Option1 Value | Map variant values (Small, Blue, etc.) |
| sku | Variant SKU | Ensure SKUs are unique |
| retail_price | Variant Price | Copy price |
| supply_price | Cost per item | Copy cost data |
| inventory_Main_Outlet | Variant Inventory Qty | Copy quantity |
Editing Customer Data for Shopify
Download Shopify’s customer CSV template and map your Lightspeed customer data exactly as shown in the template. Shopify’s customer import requires precise header matching—your file must use identical column names.
Key Mapping Requirements:
- First Name, Last Name, Email must be present
- Billing Address fields (Address1, City, Province/State, Zip, Country)
- Shipping Address fields (matching format)
- Tags for customer segmentation
Important Note on Passwords: Customer passwords cannot be migrated directly due to security encryption. After migration, customers will need to use the “forgot password” feature to set new passwords for your Shopify store.
Importing Your Data to Shopify
With your CSV files properly formatted, you’re ready to import data into Shopify.
Importing Products to Shopify
- Log into your Shopify admin panel
- Navigate to Products in the left sidebar
- Click Import
- Click Add file and select your formatted product CSV
- Deselect Publish new products to all sales channels (review products before publishing)
- Click Upload and preview
- Review the preview screen for any errors or warnings
- Click Import products
Shopify will process the import and send a confirmation email when complete. Large product catalogs may take several minutes to import.
Post-Import Product Review:
- Verify product prices imported correctly
- Check that product variants display properly
- Confirm inventory quantities are accurate
- Review product images (you may need to re-upload)
- Validate product descriptions and HTML formatting
Importing Customers to Shopify
- From Shopify admin, go to Customers
- Click Import
- Select your formatted customer CSV file
- Click Import customers
- Review import details
- Confirm the import
After the import completes, spot-check several customer records to ensure addresses and data are transferred correctly.
Importing Order History
Order history import typically requires third-party apps since Shopify’s native import focuses on products and customers. Popular options include:
EZ Importer
- Supports complex order structures
- Handles product variants within orders
- Preserves order metadata
LitExtension
- Automated order migration
- Maintains order status information
- Maps payment and shipping methods
Matrixify (formerly Excelify)
- Advanced Excel-based import tool
- Powerful for bulk operations
- Handles orders, customers, products simultaneously
Follow each app’s specific instructions for order import, as requirements vary by tool.
Preserving SEO During Migration
Maintaining search rankings requires careful attention to URL structure and proper redirect implementation.
Understanding URL Structure Changes
Lightspeed and Shopify use different URL patterns:
Lightspeed Example:
yourstore.com/products/blue-widget
yourstore.com/category/electronics
Shopify Default:
yourstore.com/products/blue-widget
yourstore.com/collections/electronics
Notice that category URLs become collection URLs. This structural difference requires redirects to prevent broken links and preserve SEO authority.
Implementing 301 Redirects
301 redirects tell search engines that a page has permanently moved to a new location, transferring the SEO value from the old URL to the new one.
Setting Up Redirects in Shopify:
- From Shopify admin, go to Online Store > Navigation
- Click URL Redirects
- Click Create URL redirect
- Enter the old Lightspeed URL path (without your domain)
- Enter the new Shopify URL path
- Click Save
Bulk Redirect Upload:
For stores with hundreds of products, create a CSV file with redirect mappings:
| Redirect from | Redirect to |
| /products/old-product-url | /products/new-product-url |
| /category/old-category | /collections/new-collection |
Import this CSV through Shopify’s bulk redirect feature or use apps like Easy Redirects or Redirect Manager.
Optimizing Product SEO Metadata
After importing products, enhance SEO elements:
Product Page Optimization:
- Write unique meta titles (60 characters max)
- Craft compelling meta descriptions (160 characters)
- Add keyword-rich alt text to product images
- Structure product descriptions with H2 and H3 headings
- Include target keywords naturally in descriptions
Collection Page Optimization:
- Create SEO-friendly collection descriptions
- Use descriptive collection names
- Add relevant keywords to collection metadata
Setting Up Your Shopify Store Post-Migration
With data migrated, configure essential store settings to begin selling.
Customizing Your Store Design
Shopify’s theme ecosystem offers extensive design options. Browse the Shopify Theme Store to find a theme matching your brand aesthetic.
Theme Selection Considerations:
- Mobile responsiveness (60%+ of traffic comes from mobile devices)
- Page load speed (faster themes convert better)
- Built-in features matching your needs
- Customization flexibility
Use Shopify’s theme editor to adjust:
- Color schemes and typography
- Layout and section arrangement
- Header and footer content
- Homepage banners and featured products
Configuring Payment Processing
Shopify Payments provides the simplest payment setup with no transaction fees (though standard credit card rates apply). If Shopify Payments isn’t available in your country, select an alternative payment gateway.
Payment Setup Steps:
- Go to Settings > Payments
- Select and activate your payment provider
- Configure payment capture settings (authorize vs. capture immediately)
- Set up your checkout preferences
Configuring Shipping Settings
Accurate shipping configuration prevents undercharging or overcharging customers.
Shipping Setup Process:
- Navigate to Settings > Shipping and delivery
- Verify your shipping origin address
- Create shipping zones (regions you ship to)
- Add shipping rates for each zone:
- Flat rate shipping
- Free shipping thresholds
- Carrier-calculated rates (for Shopify plans that support this)
- International shipping rates
- Configure package dimensions for accurate rate calculations
Setting Up Tax Collection
Shopify Tax automates tax calculations based on customer location, though you remain responsible for understanding your tax obligations.
Tax Configuration:
- Go to Settings > Taxes and duties
- Enable tax collection for regions where you have nexus
- Review Shopify’s automatic tax calculations
- Adjust rates manually if necessary
- Configure tax exemptions for wholesale customers
Managing Staff Access and Permissions
If you have team members, create staff accounts with appropriate permissions:
- Go to Settings > Users and permissions
- Click Add staff
- Enter the staff member’s email
- Select permission level:
- Full access (administrators)
- Limited access (specific sections only)
- Point of sale only (for retail staff)
- Send the invitation
Proper permission management protects sensitive business data while enabling team collaboration.
Testing Your Migrated Store
Before launching publicly, thoroughly test your Shopify store to identify any issues.
Product Testing Checklist
- Verify that all products are imported correctly
- Check that product variants display properly
- Confirm pricing appears accurately
- Test inventory tracking functionality
- Validate that product images load quickly
- Review product descriptions for formatting issues
- Test product search functionality
- Verify product collections work correctly
Checkout Testing Checklist
- Complete test transactions with each payment method
- Verify tax calculations for different locations
- Test shipping rate calculations
- Confirm that order confirmation emails are sent properly
- Check that inventory decrements after purchase
- Test discount codes and promotions
- Verify abandoned cart recovery emails
Customer Account Testing
- Create test customer accounts
- Log in as a customer and place orders
- Test password reset functionality
- Verify customer order history displays correctly
- Check that customers can edit addresses
Common Migration Challenges and Solutions
Even well-planned migrations encounter obstacles. Here’s how to address common issues.
Missing Product Images
Problem: Product images didn’t transfer or appeared broken.
Solution:
- Verify that image URLs in your product CSV are publicly accessible
- Use absolute URLs (https://yourdomain.com/image.jpg), not relative paths
- Check image file sizes (Shopify recommends under 20MB)
- Re-upload images manually if automatic import fails
- Consider using an app like Excelify for bulk image import
Product Variants Not Displaying
Problem: Products with multiple options (size, color) import as separate products instead of variants.
Solution:
- Ensure your CSV uses Shopify’s variant structure correctly
- The first row for a product includes the product title
- Subsequent rows for variants leave the title column blank
- Option names and values must be consistent across all variant rows
Customer Password Issues
Problem: Customers can’t log into their accounts after migration.
Solution:
- Passwords cannot be migrated due to encryption
- Enable “Send account activation emails” in Shopify
- Communicate with customers before migration about the password reset process
- Create a prominent “Forgot Password” link on your login page
- Consider offering a discount code to customers who activate their accounts
Broken Internal Links
Problem: Links in product descriptions or blog posts point to old Lightspeed URLs.
Solution:
- Use find-and-replace in your CSV files before import to update domain references.
- Manually review and update content after migration
- Implement comprehensive 301 redirects to catch any missed links
- Use tools like Screaming Frog to crawl your site and identify broken links
Post-Migration Optimization Strategies
Migration completion isn’t the finish line—it’s the starting line for optimization.
Speed Optimization
Page speed directly impacts conversion rates. Studies show that a 1-second delay in page load time can reduce conversions by 7%.
Speed Improvement Tactics:
- Compress product images (use WebP format when possible)
- Minimize theme code by removing unused features
- Limit the number of apps installed (each app adds code)
- Enable Shopify’s built-in image optimization
- Use a content delivery network (CDN) for faster global load times
Conversion Rate Optimization
Improve your store’s ability to turn visitors into customers:
Homepage Optimization:
- Feature best-selling products prominently
- Add social proof (customer reviews, trust badges)
- Create clear value propositions
- Include prominent search functionality
Product Page Optimization:
- Add high-quality product images (multiple angles)
- Write detailed, benefit-focused product descriptions
- Display customer reviews and ratings
- Include related product recommendations
- Add urgency elements (limited stock indicators)
Checkout Optimization:
- Enable Shopify’s accelerated checkout options
- Offer guest checkout (don’t force account creation)
- Display security trust badges
- Show shipping costs early in the process
- Minimize form fields
Analytics and Tracking Setup
Install analytics to measure performance and guide decisions:
Essential Tracking Tools:
- Google Analytics 4 (for comprehensive behavior tracking)
- Facebook Pixel (for advertising attribution)
- Google Tag Manager (for flexible tag management)
- Shopify’s native analytics (for e-commerce-specific metrics)
Track these key metrics:
- Conversion rate
- Average order value
- Customer acquisition cost
- Cart abandonment rate
- Traffic sources
- Product performance
Advanced Migration Considerations
Some stores require additional planning for successful migration.
Multi-Location Inventory Management
If you sell through multiple locations or warehouses, Shopify’s location management handles inventory across sites.
Setting Up Locations:
- Go to Settings > Locations
- Add each physical location or warehouse
- Assign inventory quantities to specific locations
- Configure which locations fulfill online orders
B2B and Wholesale Functionality
Shopify offers B2B features for wholesale operations, though this typically requires Shopify Plus for full functionality. For basic wholesale needs, apps like Wholesale Pricing Discount enable tiered pricing for specific customer groups.
Multi-Currency Support
Selling internationally requires multi-currency capabilities:
Shopify Markets: Shopify’s built-in tool for international selling handles currency conversion, local payment methods, and customs calculations.
Implementation Steps:
- Go to Settings > Markets
- Add target countries or regions
- Configure currency settings
- Set up local domain or subfolder routing
- Adjust pricing by market if needed
Point of Sale (POS) Integration
If you operate physical retail locations, Shopify POS connects online and offline sales.
POS Setup:
- Install the Shopify POS app on a tablet or smartphone
- Connect POS hardware (card readers, receipt printers)
- Sync inventory between online store and retail locations
- Train staff on the POS system
- Test transactions before going live
When to Hire Professional Migration Help
DIY migration works for small, straightforward stores, but complex situations benefit from expert assistance.
Consider Professional Help If You Have:
- Over 1,000 products
- Complex product variants or bundles
- Custom functionality in your current Lightspeed store
- Limited technical experience
- Time constraints (need to migrate quickly)
- Multiple store locations
- Significant custom development needs
Folio3’s migration experts handle data export, mapping, import, testing, and optimization, ensuring your migration succeeds without disrupting your business.
Communicating With Customers During Migration
Transparent communication prevents confusion and maintains customer trust.
Pre-Migration Communication
Two Weeks Before Migration:
- Send an email announcement explaining the change
- Highlight the benefits customers will experience
- Inform customers about password reset requirements
- Provide a timeline for the migration
One Week Before:
- Send a reminder email
- Announce any temporary service interruptions
- Share a preview of the new store design
- Address common questions
Migration Day Communication
During Migration:
- Display maintenance page with expected completion time
- Update social media channels
- Respond promptly to customer inquiries
After Migration:
- Send a welcome email to the new Shopify store
- Include password reset instructions
- Offer an incentive (discount code) for the first purchase
- Request feedback on the new store experience
Key Takeaways
Successfully migrating from Lightspeed to Shopify requires:
- Thorough data backup before beginning any migration work
- Proper CSV formatting to match Shopify’s data structure requirements
- Comprehensive 301 redirects to preserve SEO rankings and prevent broken links
- Careful testing of products, checkout, and customer accounts before launch
- Clear communication with customers about the transition and password resets
The migration process typically takes 2-4 weeks from planning to launch, depending on store complexity and data volume. While automated tools streamline data transfer, successful migrations require attention to detail in data mapping, SEO preservation, and post-migration optimization.
Conclusion
Moving to Shopify from Lightspeed opens new opportunities for growth through advanced features, better performance, and extensive customization options. By following this comprehensive migration guide, you can transfer your store data accurately, maintain SEO authority, and create an optimized shopping experience for your customers.
Whether you choose to handle the migration yourself or partner with professional services, proper planning and execution ensure your new Shopify store delivers the scalability and functionality your business needs to thrive in 2025 and beyond.
Ready to begin your Lightspeed to Shopify migration? Contact Folio3’s expert migration team for personalized guidance and support throughout your transition.
FAQs
Can I Migrate Historical Order Data From Lightspeed to Shopify?
Yes, you can migrate order history from Lightspeed to Shopify using third-party migration apps or professional services. Historical orders help maintain customer service records and provide valuable data for analytics. However, note that migrated orders won’t trigger fulfillment or payment processes—they serve as reference records only.
How Long Does a Typical Lightspeed to Shopify Migration Take?
Migration timelines vary based on store size and complexity. A small store with 100-500 products typically completes migration in 1-2 weeks. Larger stores with thousands of products and complex variants may require 3-4 weeks. Plan additional time for testing and optimization before launching publicly.
Will My SEO Rankings Drop After Migrating to Shopify?
Properly implemented 301 redirects from old Lightspeed URLs to new Shopify URLs preserve most SEO authority. You may experience temporary ranking fluctuations as search engines process the redirects, but well-executed migrations typically maintain or improve rankings due to Shopify’s superior site speed and mobile optimization.
Can I Keep My Domain Name When Migrating to Shopify?
Yes, you can transfer your existing domain to Shopify or keep it with your current registrar and point it to your Shopify store. If you transfer the domain to Shopify, you’ll manage it directly through your Shopify admin. If you keep it with your registrar, you’ll update DNS settings to point to Shopify.
What Happens to My Customer Passwords During Migration?
Customer passwords cannot be transferred due to security encryption. After migration, customers must use the “forgot password” feature to create new passwords. Communicate this change to customers before migration and consider offering an incentive for password resets.
Do I Need to Purchase Apps for My Shopify Store After Migration?
Required apps depend on your business needs. Many stores operate successfully with free or low-cost apps for basic functionality. Evaluate your requirements for email marketing, customer reviews, abandoned cart recovery, and other features, then select apps accordingly. Budget $50-200/month for apps for most mid-sized stores.