Trying to personalize the Shopping experience for your customer? Opt for WooCommerce checkout page customization, as it provides the cheapest way to streamline the order process and increase branding.
In this blog, we will discuss WooCommerce checkout page customization methods and benefits in detail. We will also provide full-fledged guides about manual and plugin methods to customize your WooCommerce checkout page.
- According to WebTribunal, WooCommerce powers 29%+ eCommerce sites on the internet.
- Meetanshi states that as of today WooCommerce has been downloaded more than 211 million times.
- Research conducted by SaaS Scout mentions that there are 5 million active business websites on the internet powered by WooCommerce.
Can You Customize WooCommerce Checkout Page
Yes, it is possible to customize WooCommerce checkout page. WooCommerce provides several customization options through its settings and various hooks and filters that developers can use to modify the appearance and functionality of the checkout page.
Benefits Of Customizing WooCommerce Checkout Page
WooCommerce customize checkout page can provide several benefits for both you as a store owner and your customers. Here are some of the benefits of customizing the WooCommerce checkout page:
Improved User Experience
Customizing the checkout page can improve the user experience for your customers by making the process more streamlined, user-friendly, and personalized to your brand.
Increased Conversion Rates
WooCommerce custom fields checkout can help increase conversion rates by reducing cart abandonment, improving trust and credibility, and making the checkout process faster and easier for customers.
Increased Customer Satisfaction
A customized checkout page can help improve customer satisfaction by providing a more personalized and relevant checkout experience that meets their specific needs.
Increased Flexibility
Customizing the checkout page allows you to add or remove fields, change the layout, and add custom functionality to suit your specific business needs and requirements. It can be highly helpful if you Dropshipping with WooCommerce and need specific data like Zip Code or PO Box number.
Improved Data Collection
By customizing the checkout page, you can collect more relevant and useful data from your customers, which can help you make better business decisions and improve your marketing efforts.
Overall, customizing the WooCommerce checkout page can help you provide a more seamless and enjoyable checkout experience for your customers, increase conversion rates, and improve your overall business performance.
Step By Step Guide to Editing Checkout in WooCommerce Via a Plugin
With the help of plugins, you can edit the WooCommerce checkout page in real-time and visually as well.
Customizing the WooCommerce checkout page with a plugin is an easy and convenient way to make changes without having to write code.
Here is a step-by-step guide WooCommerce checkout page customization with the help of a plugin:
Install a WooCommerce Checkout Page Plugin
Several WooCommerce checkout page plugins are available, such as Checkout Field Editor (Checkout Manager) for WooCommerce. You can find and install a suitable plugin from the WordPress plugin repository to edit and create a custom checkout page WooCommerce.
Activate the Plugin
After installing the plugin, activate it in the WordPress dashboard. This will add a new menu item to the WooCommerce settings menu.
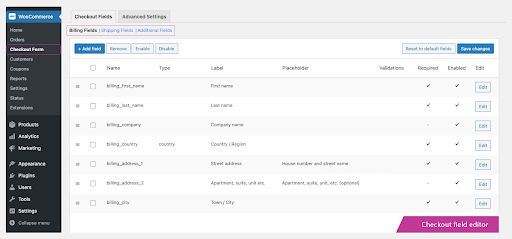
Configure the Plugin Settings
Once the plugin is activated, navigate to the new menu item in the WooCommerce settings menu.
From there, you can configure the plugin settings to customize the checkout page according to your requirements. For example, you can add or remove fields, change field labels, set field requirements, or modify the order of fields.
Some plugins even provide a WooCommerce checkout template, which you can easily apply with a single click.
Save Your Changes
After configuring the plugin settings, save your changes. The changes you made will now be reflected on the WooCommerce checkout page.
Test Your Checkout Page
After making changes to your WooCommerce checkout page; it is important to test it thoroughly to ensure it is functioning correctly. Test the checkout process by going through the checkout flow, making sure all the fields are displaying correctly, and the payment gateway is working correctly.
Deploy Your Changes
Once you are satisfied with your changes, you can deploy them to your live site. Make sure to clear any cache or performance optimizations that might interfere with the functionality of the checkout page.
In summary, customizing the WooCommerce checkout page with a plugin is a straightforward process that does not require any coding knowledge. With the right plugin, you can make changes to the checkout page quickly and easily, allowing you to create a checkout page that meets your specific requirements.
Step By Step Guide To Manually Editing The Checkout In WordPress
Customizing the WooCommerce checkout page manually involves editing the theme files directly. Here is a step-by-step guide on how to customize the WooCommerce checkout page manually:
Create a Child Theme
The first step is to create a child theme in WordPress.
This is important because it allows you to make changes to your website without affecting the parent theme. You can create a child theme using a plugin or manually by creating a new folder in your theme directory and adding a style.css file with the required information.
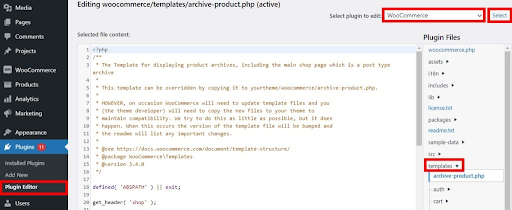
Locate the WooCommerce Template Files
You can customize the checkout page by editing the WooCommerce template files. You can locate these files by navigating to your Plugins > Plugin Editor. If you don’t find the Plugin Editor option, you can download the plugin and activate it. Select the WooCommerce option from the drop down menu.
Copy the Template Files
Once you have located the template files, you can copy the files you want to customize into your child theme folder. This will ensure that any changes you make will not be lost when you update WooCommerce or your theme. You can copy the entire “checkout” part or the individual files you want to customize.
Customize the Template Files
Open the template files you copied into your child theme folder using a code editor. You can then modify the files as needed to customize the checkout page. You can add or remove fields, change the layout, or add custom CSS styles. For example, you can modify the checkout form by adding or removing fields, changing their labels, or adding custom validation.
Save Your Changes
Make sure to keep saving every time you add a new piece of code so that you don’t lose your progress, as WordPress does not have an autosave feature.
Preview the Page
Instead of checking the customization normally on the live site, we will suggest you check it on a local host server so that if you find any error, you can easily solve it without any effect on your live site. Another reason you must test the checkout page before going live is to ensure that the code is not incompatible with other plugins and themes on your website.
Manually customizing the WooCommerce checkout page involves editing the template files. This approach requires some coding knowledge but gives you complete control over the checkout page.
Conclusion
Now that we have explained everything about WooCommerce checkout page customization, it should be very easy for you to implement WooCommerce checkout page customization techniques within your own store. Go ahead and follow the guide to elevate your store design!
FAQs
Here are some frequently asked questions (FAQs) regarding customizing the checkout page in WooCommerce:
Can I Customize The Checkout Page Without Coding?
Yes, you can use plugins to customize the checkout page without coding. These plugins provide an easy-to-use interface for making customizations.
What Kind Of Customizations Can I Make To The Checkout Page?
You can customize the checkout page in various ways, such as changing the layout, adding or removing fields, customizing buttons, and adding custom payment gateways.
Will Customizing The Checkout Page Affect The Functionality Of My Site?
Yes. Customizing the checkout page can affect the functionality of your site if you make changes that conflict with other plugins or themes. It’s important to test any customizations thoroughly before implementing them on your live site.
Can I Revert To The Default Checkout Page After Customizing It?
Yes, you can revert to the default checkout page by disabling any plugins or code that you used to make customizations. However, any custom fields or functionality you added will be lost.
Will Customizing The Checkout Page Affect My Payment Gateway?
No. WooCommerce checkout page customization should not affect any payment gateway if you’ve used a correct method to customize your page.