The online shopping landscape has evolved dramatically. Today’s customers expect flexibility in how they pay, and merchants who offer Buy Now, Pay Later (BNPL) options consistently see higher conversion rates and larger cart values. Learning how to add Afterpay to Shopify isn’t just about adding another payment method—it’s about removing purchase barriers and meeting customer expectations in 2025.
This guide walks you through everything you need to know about integrating Afterpay with your Shopify store, from initial setup to optimization strategies that maximize your BNPL investment.
Summary
- Afterpay Integration Benefits: Adding Afterpay to your Shopify store can increase average order values by up to 40% while reducing cart abandonment by enabling customers to split purchases into four interest-free installments
- Three Setup Methods: Merchants can add Afterpay to Shopify through native payment gateway integration, the Afterpay app from the Shopify App Store, or manual theme code installation for advanced customization
- Product Page Optimization: Displaying Afterpay messaging prominently on product pages is crucial for driving adoption and informing purchase decisions
- Multi-Currency Support: Afterpay works with Shopify Markets, automatically showing to customers in supported regions (US, CA, AU, NZ, UK) when they shop in their local currency
- Merchant Costs: While Afterpay typically charges 4-6% plus $0.30 per transaction, increased conversion rates usually offset these fees, with merchants receiving full payment upfront
What Is Afterpay and How Does It Work?
Afterpay represents a shift in consumer payment preferences. As a leading BNPL platform, Afterpay allows customers to split purchases into four equal, interest-free payments spread over six weeks. Customers pay the first installment at checkout, then three more installments every two weeks.
For merchants, the model is straightforward and low-risk. You receive full payment upfront, minus Afterpay’s processing fee. Afterpay assumes all credit and fraud risk, collecting installments directly from customers. If a customer misses a payment, they face late fees—but that never affects your payment as the merchant.
Afterpay currently operates in the United States, Canada, Australia, New Zealand, and the United Kingdom (branded as Clearpay in the UK). The service has minimum and maximum purchase limits that vary by region, typically ranging from $35 to $1,000 USD.
Why Add Afterpay to Your Shopify Store?
Understanding the business case helps you maximize your Afterpay integration. Multiple studies reveal consistent patterns in how BNPL options impact store performance.
Afterpay can increase conversion rates by 20-30% on average. The psychology is simple: customers commit more readily when they see smaller installment amounts rather than full prices. A $200 purchase becomes “four payments of $50,” which feels more manageable to many shoppers.
Merchants consistently report 30-40% increases in average order value after adding Afterpay. When customers can split payments, they tend to purchase higher-priced items or add more products to their cart. The $35 minimum order requirement also naturally encourages customers to increase cart size.
Cart abandonment rates drop significantly when flexible payment options appear. Many customers hesitate at checkout when faced with the total amount. Seeing the Afterpay option often provides the final nudge they need to complete their purchase.
As BNPL becomes standard across e-commerce, stores without flexible payment options risk losing customers to competitors. Younger demographics—particularly Millennials and Gen Z—actively seek out stores offering these payment methods.
Unlike traditional installment plans, Afterpay eliminates all risk from your business. You receive full payment immediately, and Afterpay handles all customer payment collection and potential defaults.
Requirements Before You Add Afterpay to Shopify
Before starting the integration process, verify you meet these basic requirements. Your Shopify store must be active and not protected by password mode. Afterpay only works with live, public stores.
Your business must operate primarily in a supported region: United States, Canada, Australia, New Zealand, or the United Kingdom. While you can sell internationally, your primary business location determines Afterpay availability.
You need an approved Afterpay merchant account. The application process typically takes 2-3 business days and requires standard business information including bank account details for payment settlements.
Your Shopify theme should ideally be a Shopify 2.0 theme for easiest integration, though older themes can still work with manual code additions. Consider your average order value and typical product prices. Afterpay works best for stores with products priced between $35-$1,000.
How to Add Afterpay to Shopify: Three Methods
You have three main approaches to add Afterpay to Shopify store, each with different complexity levels and customization options.
Method 1: Native Payment Gateway Integration
This method integrates Afterpay directly into your Shopify checkout as an alternative payment method. It’s the quickest setup and recommended for most merchants.
Start by signing up for an Afterpay merchant account at the Afterpay business portal. Complete the application with your business details, tax information, and bank account for settlements. After approval, you’ll receive a Merchant ID and Secret Key needed for integration.
Log into your Shopify admin panel and navigate to Settings, then Payments. Scroll down to the Alternative Payment Methods section and click “Add payment method.” Search for Afterpay in the provider list and select it.
Enter your Merchant ID and Secret Key in the provided fields. These credentials link your Afterpay merchant account to your Shopify store. Before activating, verify all settings are correct. Unless you’re specifically testing, ensure the “Enable test mode” checkbox is unchecked. Click “Activate” to enable Afterpay at checkout.
Test the integration by visiting your store as a customer. Add products to your cart and proceed to checkout. Afterpay should now appear as a payment option alongside credit cards and other methods. For additional guidance on Shopify website design services, explore our comprehensive resources.
Method 2: Afterpay App Installation
The Afterpay app from the Shopify App Store provides a streamlined setup process with built-in customization options for displaying Afterpay messaging throughout your store.
Navigate to the Shopify App Store through your admin panel. Search for “Afterpay” and locate the official Afterpay app. Click “Add app” to begin installation. The app will request permission to access your store data and integrate with your theme.
Sign in with your Afterpay merchant credentials or create a new merchant account directly through the app installation process. The app automatically configures your payment gateway settings.
Once connected, the app provides configuration options for where and how Afterpay messaging appears. You can enable installment amount displays on product pages, cart pages, and collection pages with simple toggles. The app also includes analytics showing how many customers use Afterpay and conversion rate impacts. Working with a Shopify ecommerce development company can streamline this integration process.
Method 3: Manual Theme Code Integration
For merchants wanting maximum control over Afterpay’s appearance, manual code integration offers complete customization. This method requires some technical knowledge or assistance from a Shopify app development services provider.
Begin by accessing your theme files. From your Shopify admin, go to Online Store, then Themes. Click the three-dot menu on your active theme and select “Edit code.”
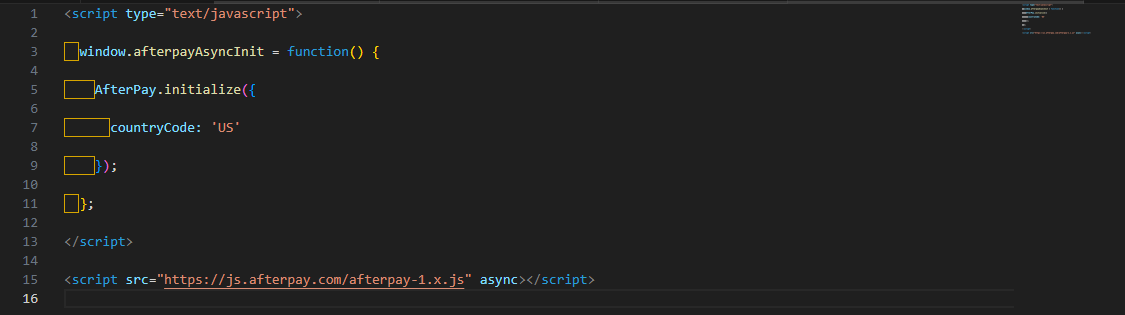
Add the Afterpay JavaScript library. Open your theme.liquid file and add this code before the closing </head> tag:
html
Next, add Afterpay messaging to your product pages. Locate the section displaying your product price and add this code below it:
html
<div class=”afterpay-installments” data-amount=”{{ product.price | money_without_currency | remove: ‘,’ }}”></div>
This creates a container where Afterpay’s JavaScript will insert the installment messaging. Save all files and test thoroughly on your live store.

How to Add Afterpay to Shopify Product Page
The product page represents your most critical touchpoint for Afterpay adoption. Research shows that displaying installment amounts directly on product pages increases BNPL usage by 40-50% compared to only showing it at checkout.
If you used the Afterpay app, product page messaging typically enables with a simple toggle in the app settings. Navigate to the Afterpay app dashboard and activate the “Product page messaging” option. You can customize the position and styling to match your theme.
Position the message strategically. Most stores find the best placement is immediately below the product price but above the add to cart button. This placement catches attention at the moment customers evaluate whether to purchase.
For variable products with multiple price points, ensure the Afterpay message updates dynamically when customers select different variants. The code examples above should handle this automatically, but test with actual variant selections to confirm.
Adding Afterpay Logo and Branding Elements
Brand recognition matters. Customers who recognize the Afterpay logo are more likely to use the service. Strategic logo placement throughout your store builds trust and awareness.
Most implementations automatically include the Afterpay logo as part of the installment messaging. However, you can add additional logo placements for emphasis. Afterpay provides official brand assets through their merchant portal.
Adding the Afterpay logo to your store footer serves as a trust signal and reminds customers about the payment option. Using Shopify’s theme customizer, add an image block to your footer section. Upload the Afterpay logo and optionally link it to a page explaining how Afterpay works.
The Afterpay logo automatically appears as part of the payment method selection at checkout when you integrate through the payment gateway method. You can adjust the display order of payment methods in your Shopify payment settings.
Setting Up Multi-Currency Support with Afterpay
If you sell internationally using Shopify Markets or multi-currency apps, understanding how Afterpay works with different currencies ensures smooth customer experiences.
Afterpay supports local currencies in its operating regions: USD in the United States, CAD in Canada, AUD in Australia, NZD in New Zealand, and GBP in the United Kingdom. The payment option automatically appears only when customers shop in supported currencies within supported regions.
When using Shopify Markets, configure your market settings to align with Afterpay’s geographic availability. In your Shopify admin, go to Settings > Markets and ensure you have separate market configurations for Afterpay-supported countries.
The Afterpay integration detects the customer’s selected currency and location automatically. For the installment messaging to display correctly across currencies, ensure your implementation uses Shopify’s liquid filters to pass the correct price in the customer’s selected currency. Leveraging Shopify ecommerce integration services can help optimize this setup.
Creating an Afterpay Information Page
An FAQ or information page dedicated to explaining how Afterpay works on your store answers customer questions and reduces checkout friction.
In your Shopify admin, navigate to Online Store > Pages and click “Add page.” Title it “Pay with Afterpay” or “Afterpay Payment Information.”
Start with a brief explanation of what Afterpay is and how it benefits shoppers: no interest, no hidden fees, simple installments. Explain the payment schedule clearly, detailing how the four installments work and when payments are due.
Address eligibility requirements. Explain that customers need to be at least 18 years old, have a valid debit or credit card, and pass Afterpay’s instant approval process. Clarify any order value limits. Standard Afterpay limits are $35 minimum and $1,000 maximum.
Include information about returns and refunds. Explain that if a customer returns an Afterpay purchase, refunds process normally, and Afterpay adjusts their payment plan accordingly.
Link this page from multiple locations throughout your store including footer navigation, checkout page references, and your payment methods FAQ section.
Troubleshooting Common Afterpay Integration Issues
Even with straightforward setup processes, merchants sometimes encounter issues. Here are common problems and solutions.
If Afterpay doesn’t show as a payment option, verify your merchant account status. Log into your Afterpay merchant portal and confirm your account is active and approved. Check that you correctly entered your Merchant ID and Secret Key in Shopify.
Ensure your store meets the minimum order requirements. If a customer’s cart total is below your configured minimum (often $35), Afterpay won’t appear as an option. Verify the customer’s location, as Afterpay only displays to customers in supported countries.
If installment messaging isn’t showing on product pages, check that you enabled product page messaging in the app settings. For manual code implementations, verify the JavaScript library loaded correctly by checking your browser’s developer console for errors.
Confirm your data-amount attributes pass prices correctly. Use Shopify’s liquid filters to ensure clean number output without currency symbols or commas.
Optimizing Your Afterpay Integration for Maximum Impact
Simply adding Afterpay isn’t enough. Strategic optimization increases adoption rates and maximizes conversion benefits.
Make Afterpay visible throughout the customer journey. In addition to checkout and product pages, consider adding callouts to collection pages, homepage banners, cart drawers, and email marketing promotions.
The Afterpay message should be noticeable but not overwhelming. Use visual design to draw attention without disrupting the page’s overall aesthetic. A subtle background color, border, or icon can make the message stand out.
Test different messaging approaches to find what resonates with your customers. Try variations like “Pay in 4 interest-free installments” versus “Buy now, pay later with Afterpay” and track conversion rates with each variation.
Create content marketing around flexible payment options. Blog posts, social media content, and email campaigns that educate customers about BNPL build awareness and comfort with using the service.
Afterpay Fees and Cost Considerations
Understanding the financial implications helps you set appropriate pricing strategies and evaluate ROI from your Afterpay integration.
Afterpay typically charges merchants 4-6% of the transaction value plus $0.30 per transaction. Exact rates depend on your merchant agreement, sales volume, and region. These fees are higher than standard credit card processing, but the increased conversions and average order values typically offset the additional cost.
Calculate your specific break-even point. Track metrics before and after Afterpay implementation: conversion rate, average order value, and total sales volume. Most merchants find the revenue increase far exceeds the additional processing costs.
Remember you receive full payment upfront, improving cash flow compared to traditional installment arrangements. There’s zero risk of non-payment—if the customer defaults, that’s Afterpay’s loss, not yours.
Alternatives to Afterpay for Shopify
While Afterpay is popular and effective, several other BNPL providers integrate with Shopify. Klarna operates globally and offers more flexible payment plans, including pay-in-30-days and longer-term financing options. Affirm focuses on larger purchases with longer payment terms up to 36 months.
Sezzle primarily serves US and Canadian markets with a four-payment structure similar to Afterpay, often charging lower merchant fees. Shop Pay Installments, Shopify’s native BNPL solution, integrates seamlessly with stores using Shopify Payments.
You can offer multiple BNPL providers simultaneously, giving customers choice. However, most merchants find success with one or two well-implemented BNPL providers rather than overwhelming customers with options.
Key Takeaways
- Multiple Integration Methods: Choose between native payment gateway setup, the Afterpay app, or manual code integration based on your technical comfort level—all methods work effectively when implemented correctly
- Strategic Placement Drives Adoption: Displaying Afterpay messaging prominently on product pages increases usage by 40-50%, with optimal placement immediately below the price and above the add to cart button
- Monitor Performance Metrics: Track conversion rates, average order values, and cart abandonment before and after implementation to quantify ROI and justify the processing fees
- Mobile Optimization Matters: Ensure Afterpay messaging displays correctly on smartphones and tablets, where over 70% of e-commerce traffic originates
- Customer Education Reduces Friction: Creating dedicated information pages and promoting the payment option through marketing channels builds customer confidence and increases adoption rates
Conclusion
Learning how to add Afterpay to Shopify product page successfully requires more than just technical setup. The most effective implementations combine proper integration with strategic placement, customer education, and ongoing optimization.
Merchants who thoughtfully integrate and promote Afterpay consistently see meaningful improvements in conversion rates and average order values. Start with proper technical implementation using the method that matches your skills and needs. Then focus on making Afterpay visible throughout your customer’s journey—from their first product view through final checkout.
Ready to add Afterpay to Shopify and start capturing more conversions? Contact our team for expert Shopify integration support and ensure your BNPL implementation drives maximum results.
FAQs
Is Afterpay Available for All Shopify Plans?
Yes, Afterpay works with all Shopify plans including Basic Shopify, Shopify, and Advanced Shopify. However, you need an approved Afterpay merchant account regardless of your Shopify subscription level.
How Long Does It Take to Set Up Afterpay on Shopify?
The technical integration takes 15-30 minutes once you have an approved merchant account. Afterpay merchant account approval typically requires 2-3 business days. Plan for about one week total from application to fully operational integration.
Can Customers Use Afterpay for Subscriptions or Digital Products?
Afterpay generally works best for one-time physical product purchases. Subscription products and digital goods may have restrictions depending on your Afterpay merchant agreement. Check with Afterpay directly about eligibility for non-traditional product types.
Do I Need to Display Afterpay Messaging on Every Product?
While not required, displaying Afterpay messaging on all eligible products maximizes the conversion benefit. You can exclude specific products using conditional logic in your theme code if certain items shouldn’t qualify for installment payments.
What Happens If a Customer Returns an Afterpay Purchase?
Returns process normally through your standard return procedures. Issue the refund through Shopify as usual, and Afterpay automatically adjusts the customer’s payment plan. If the customer hasn’t completed their payments, Afterpay reduces or cancels their remaining installments.
Can International Customers Use Afterpay on My Store?
Afterpay only works for customers in supported regions shopping in supported currencies. A customer in France cannot use Afterpay even on a US store. However, if you ship internationally and a customer in Australia shops on your US store while it displays AUD pricing, they may be able to use Afterpay.
Does Adding Afterpay Affect My Shopify Checkout Conversion Rate?
Adding Afterpay typically increases checkout conversion rates by 20-30% because it removes payment barriers for price-sensitive customers. Ensure your implementation doesn’t slow page load times or complicate the checkout process.
Can I Customize the Afterpay Message Colors and Styling?
Yes, you can apply custom CSS to style Afterpay messaging to match your brand. The app provides some built-in customization options, while manual implementations give you complete control over appearance through CSS styling.