Your WooCommerce store generates valuable customer data every day—but without the right email marketing connection, most of it goes unused. If you’re still sending batch-and-blast newsletters instead of behavior-triggered emails, you’re leaving revenue on the table.
This guide walks you through the full Klaviyo WooCommerce integration process—from installing the plugin to setting up automation flows that drive repeat purchases. By the end, you’ll know exactly how to connect both platforms, what data gets synced, and which automations to activate first.
Summary
- Install the Klaviyo WooCommerce plugin via your WordPress dashboard and configure it with your Public API key.
- Connect WooCommerce to Klaviyo by generating a Consumer Key and Secret from WooCommerce’s REST API settings.
- Klaviyo syncs the last 90 days of order history automatically upon connection; full historical sync follows.
- Key automation flows to activate first: abandoned cart, welcome series, post-purchase, and browse abandonment.
- Avoid common mistakes like subscribing all customers to a list without explicit opt-in consent.
- Monitor integration health through Klaviyo’s Metrics tab and validate synced data against WooCommerce order counts.
Why Klaviyo and WooCommerce Work Well Together
Most email platforms treat WooCommerce like any other data source. Klaviyo is built specifically for e-commerce, which changes the equation. The klaviyo and woocommerce combination gives you real-time event tracking, customer profile enrichment, and segmentation based on actual purchase behavior—not just email opens.
What the Integration Unlocks
Once connected, Klaviyo captures event data directly from your WooCommerce store. Every checkout start, product view, order placement, and cancellation becomes actionable. This means you can trigger personalized emails based on what customers actually do, not just what list they’re on.
| Feature | Basic Email Platform | Klaviyo + WooCommerce |
| Real-time behavior triggers | No | Yes |
| Purchase history segmentation | Limited | Full order data |
| Abandoned cart recovery | Manual setup | Automated, multi-step |
| Product-specific flows | No | Yes |
| Predictive analytics (CLV, churn) | No | Built-in |
| Browse abandonment tracking | No | Yes |
According to Klaviyo’s own benchmarks, stores using triggered flows generate significantly higher revenue per recipient compared to standard broadcast campaigns. The Klaviyo WooCommerce plugin makes this level of automation accessible without custom development.
How to Set Up the Klaviyo WooCommerce Integration
The setup process has three main parts: installing the plugin, generating the WooCommerce API credentials, and connecting both platforms inside Klaviyo. Follow these steps in order to avoid common configuration errors.
Step 1: Install the Klaviyo WooCommerce Plugin
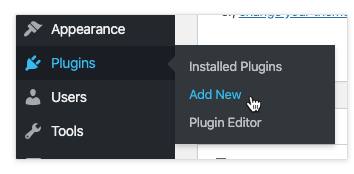
- Log in to your WordPress admin dashboard.
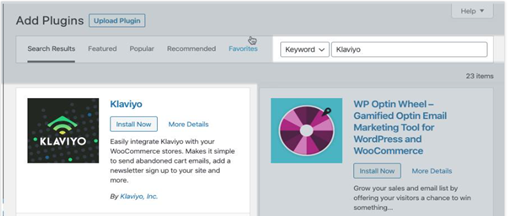
- Go to Plugins > Add New and search for “Klaviyo.”
- Click Install Now on the official Klaviyo plugin, then Activate.
- Navigate to Plugins > Installed Plugins, find Klaviyo, and click Settings.
- Paste your Klaviyo Public API key (found under Account > Settings > API Keys).
- Enable the “Klaviyo Signup Forms” option if you want embedded forms on your site.
- Click Save Settings.
Your Public API key is also called your Site ID—both terms refer to the same credential. Keep the Disable Configuration Warning option unchecked so you can catch any setup issues early.
Step 2: Generate WooCommerce API Credentials
- In WordPress, go to WooCommerce > Settings > Advanced > REST API.
- Click Add Key to create a new API credential.
- Set Description to something identifiable like “Klaviyo Integration.”
- Set Permissions to Read/Write.
- Click Generate API Key.
- Copy both the Consumer Key and Consumer Secret—you’ll need these immediately.
Important: The Consumer Secret is only displayed once. Copy it before closing the page or you’ll need to regenerate new credentials.
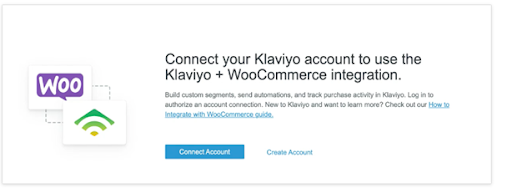
Step 3: Connect WooCommerce to Klaviyo
- Log in to your Klaviyo account and go to Integrations > All Integrations.
- Search for WooCommerce and click Add Integration.
- Enter your Store URL (the same URL customers use to access your store).
- Paste the Consumer Key and Consumer Secret from Step 2.
- Set your Global Currency Code if you operate in multiple currencies.
- For the “Subscribe new customers to a Klaviyo list” option—leave this unchecked unless you have a compliant opt-in flow in place.
- Click Connect to WooCommerce.
If you encounter an “Unable to test API” error at this stage, verify that your Store URL is exactly correct and that the API credentials have Read/Write permissions.
Understanding Data Sync and Historical Records
When you first complete the WooCommerce Klaviyo integration, the platform automatically syncs the last 90 days of order data. This gives you an immediate customer base to work with. Full historical sync begins afterward and can take anywhere from a few minutes to several days, depending on your store’s order volume.
What Data Syncs Between Platforms
| Data Type | Sync Direction | Klaviyo Metric Name |
| Order placed | WooCommerce → Klaviyo | Placed Order |
| Checkout started | WooCommerce → Klaviyo | Started Checkout |
| Product viewed | WooCommerce → Klaviyo | Viewed Product |
| Order refunded | WooCommerce → Klaviyo | Refunded Order |
| Order cancelled | WooCommerce → Klaviyo | Cancelled Order |
| Customer profile data | WooCommerce → Klaviyo | Updated profile |
How to Verify Your Sync Is Working
To confirm data is flowing correctly, go to Klaviyo’s Metrics tab and select WooCommerce from the dropdown. Look for the Placed Order metric and adjust the date range to match a recent period you can verify in WooCommerce. If the counts don’t match, check that your account time zones are aligned in both platforms.
You can also test the plugin directly: add an item to your cart on your website, proceed to checkout, and enter your email address. Within a few minutes, a Started Checkout event should appear in your Klaviyo activity feed.
Monitoring the Integration Over Time
Klaviyo limits accounts to 200 unique metrics. As you add integrations and custom events, monitor your usage to avoid hitting this ceiling. Check the Integrations tab in Klaviyo periodically to confirm the WooCommerce connection shows as active and there are no API errors.
Setting Up the Opt-In Checkbox at Checkout
One of the most important—and most overlooked—steps when you integrate Klaviyo with WordPress is configuring a proper opt-in checkbox at checkout. This affects both compliance and list quality.
Why the Default Setup Creates a Compliance Risk
By default, WooCommerce does not include a “accepts marketing” checkbox. This means that if you use the “Subscribe new customers to a Klaviyo list” option without adding an explicit checkbox, customers get added to your list without knowingly opting in. In markets with strict email regulations like GDPR or CAN-SPAM jurisdictions, this creates real exposure.
How to Add the Opt-In Checkbox
- In WordPress, go to Plugins > Klaviyo Settings.
- Enable the “Add a subscribed to newsletter on the checkout page” option.
- Select the Klaviyo list where subscribers should be added.
- Copy the List ID from Klaviyo (found under Lists > List Settings).
- Click Save Settings.
Once enabled, a newsletter opt-in checkbox will appear on your WooCommerce checkout page. Only customers who check this box will be added to the selected Klaviyo list. This keeps your list clean and your sending reputation strong.
Key Automation Flows to Activate After Integration
Connecting the platforms is only step one. The real value of the Klaviyo WooCommerce setup comes from automating the right messages at the right time. These four flows deliver the strongest return for most WooCommerce stores.
Abandoned Cart Flow
Abandoned cart emails are the highest-ROI automation for most e-commerce stores. With Klaviyo WooCommerce connected, you can trigger a multi-step sequence when a customer starts checkout but doesn’t complete it. A common structure is: Email 1 at 1 hour, Email 2 at 24 hours, Email 3 at 72 hours.
Welcome Series
New subscribers who haven’t purchased yet respond well to a welcome sequence that introduces your brand, sets expectations, and offers a first-purchase incentive. The WooCommerce data sync gives Klaviyo enough context to personalize these messages from the start.
Post-Purchase Flow
Use order data from the WooCommerce Klaviyo integration to trigger cross-sell and review request emails after a purchase. Segment by product category purchased to keep recommendations relevant. For example, a customer who bought running shoes can receive a follow-up about running accessories rather than an unrelated product category.
Browse Abandonment Flow
This flow targets customers who viewed a product but didn’t add it to their cart. It requires the Klaviyo plugin to be active and tracking page views on your WooCommerce store. Browse abandonment emails typically have lower conversion rates than cart abandonment but can cover a much larger audience segment.
| Flow Type | Trigger Event | Avg. Conversion Rate | Setup Complexity |
| Abandoned Cart | Started Checkout (no order) | 5–15% | Low |
| Welcome Series | New subscriber added | 2–5% | Low |
| Post-Purchase | Placed Order | 3–8% | Medium |
| Browse Abandonment | Viewed Product (no cart) | 1–3% | Medium |
| Win-Back | No purchase in 90+ days | 2–5% | Low |
Start with abandoned cart and welcome series before building out the rest. These two flows alone can recover significant revenue and don’t require advanced segmentation to perform well.
Common Mistakes to Avoid With the Klaviyo WooCommerce Plugin
Even a technically correct setup can underperform if these common mistakes aren’t avoided upfront.
Using the Wrong Store URL
When entering your Store URL in Klaviyo’s integration settings, use the exact URL customers use to access your site—including the correct protocol (https://) and without any trailing slashes or subpaths unless your store lives in a subdirectory. A mismatch here is the most common cause of connection failures.
Enabling Auto-Subscribe Without Consent
As covered above, enabling “Subscribe new customers to a Klaviyo list” without a corresponding opt-in checkbox can create compliance issues and list quality problems. Purchased-but-not-opted-in contacts tend to have low engagement and high unsubscribe rates, which hurts your sender reputation over time.
Skipping the Integration Test
Always test your integration after setup using the Started Checkout method described earlier. Assumptions about data flow can lead to weeks of missing data before you realize the connection isn’t working properly.
Ignoring Time Zone Alignment
If your Klaviyo account time zone differs from your WooCommerce store time zone, historical data validation will appear inconsistent. Check both settings before running any order count comparisons.
Klaviyo WooCommerce Integration vs. Other Email Platforms
When evaluating whether the Klaviyo and WooCommerce combination is right for your store, it helps to understand what sets it apart from alternatives like Mailchimp or ActiveCampaign.
| Capability | Klaviyo + WooCommerce | Mailchimp + WooCommerce | ActiveCampaign + WooCommerce |
| Native WooCommerce integration | Yes (official plugin) | Yes (official plugin) | Third-party required |
| Real-time event tracking | Yes | Partial | Yes |
| Predictive CLV scoring | Built-in | No | No |
| Revenue attribution reporting | Yes | Basic | Yes |
| SMS + Email in same platform | Yes | Limited | Yes |
| Free tier available | Up to 250 contacts | Up to 500 contacts | 14-day trial only |
For WooCommerce stores focused on scaling e-commerce revenue, Klaviyo’s native data model gives it an edge. Its segmentation and flow logic are built specifically around purchase events, not adapted from general-purpose marketing automation.
If you’re exploring how WooCommerce compares to other platforms for your broader e-commerce strategy, see our guide on WooCommerce vs Shopify: Choosing the Right eCommerce Platform to understand the platform-level differences before committing to a stack.
Advanced Segmentation Using WooCommerce Data in Klaviyo
Once your integration is running and data is flowing, you can build segments that go beyond basic demographics. This is where the klaviyo integration with woocommerce starts to create a meaningful competitive advantage.
Segments Worth Building First
- Customers who purchased once but not in the last 60 days — prime win-back candidates.
- Customers with 3+ orders — high-value loyalists worth targeting with VIP offers.
- Customers who viewed a product category in the last 7 days but haven’t purchased — ideal for product-specific campaigns.
- Customers with average order value above a defined threshold — high-LTV segment for premium upsell.
WooCommerce order data flows into Klaviyo profiles in real time after the initial sync, so these segments stay current automatically. No manual CSV imports or monthly data refreshes needed.
Using Klaviyo’s Predictive Analytics
After your store accumulates sufficient order history (typically 6+ months and several hundred orders), Klaviyo’s predictive analytics features become available. These include predicted lifetime value, churn risk scores, and next purchase date predictions—all derived from your WooCommerce transaction data.
For stores managing complex customer data across systems, our guide on WooCommerce REST API: Guide to Integrate in 2025 covers how to extend WooCommerce’s data capabilities further.
Key Takeaways
- The Klaviyo WooCommerce integration is a three-step process: install the plugin, generate WooCommerce API credentials, and connect both platforms inside Klaviyo.
- Klaviyo syncs 90 days of historical data automatically, followed by full historical sync that can take up to several days for large stores.
- Always add an explicit opt-in checkbox at checkout before enabling auto-subscribe to protect compliance and list quality.
- Abandoned cart and welcome series flows should be your first automation priority—they have the lowest setup complexity and highest impact.
- Klaviyo’s predictive analytics and real-time segmentation give WooCommerce stores a clear edge over general-purpose email platforms.
Conclusion
Setting up the Klaviyo WooCommerce integration is one of the highest-leverage moves a WooCommerce store can make. Once the connection is live and data is flowing, you have the raw material for personalized, behavior-triggered email marketing that performs far better than broadcast campaigns.
The setup process is straightforward, but the mistakes covered here—wrong store URL, skipping opt-in consent, and ignoring time zone alignment—are worth avoiding from day one. If you want help configuring the integration correctly or building out your first automation flows, talk to our WooCommerce development team to get started.
FAQs
How Does the Klaviyo WooCommerce Integration Work?
The Klaviyo WooCommerce plugin connects your WordPress store to Klaviyo via REST API. It sends real-time e-commerce events—such as orders placed, checkouts started, and products viewed—directly to Klaviyo. This data populates customer profiles and powers behavior-based email flows without any manual data transfer.
Is the Klaviyo WooCommerce Plugin Free?
The plugin itself is free to install from the WordPress plugin directory. Klaviyo’s pricing is based on the number of active contacts in your account. There is a free tier for up to 250 contacts with up to 500 email sends per month. Costs scale with list size above that threshold.
How Long Does WooCommerce Data Take to Sync in Klaviyo?
Klaviyo syncs the last 90 days of order data immediately upon connection. Full historical sync follows and can take minutes to several days depending on order volume. After initial sync, new WooCommerce data flows into Klaviyo in real time.
Can I Integrate Klaviyo With WordPress Without WooCommerce?
Yes. The Klaviyo plugin works on any WordPress site for signup form embedding and basic tracking. However, e-commerce events like Placed Order or Started Checkout only fire when WooCommerce is active, since those events depend on WooCommerce’s checkout and order data.
What WooCommerce Events Does Klaviyo Track?
Klaviyo tracks Placed Order, Started Checkout, Viewed Product, Ordered Product (line-item level), Refunded Order, Cancelled Order, and Fulfilled Order. These events appear in Klaviyo’s Metrics tab under the WooCommerce filter and can be used as flow triggers or segmentation conditions.
Does Klaviyo WooCommerce Integration Support Multi-Currency Stores?
Yes. During integration setup, you can enable a Global Currency Code option that converts all order values to a single standard currency within Klaviyo. This is useful for stores selling internationally with prices displayed in local currencies.
What Happens If the Klaviyo WooCommerce Connection Breaks?
If the integration disconnects, Klaviyo stops receiving real-time events from WooCommerce. Existing profiles and historical data remain intact. To reconnect, verify your Consumer Key and Consumer Secret in Klaviyo’s integration settings. If credentials have expired, regenerate them in WooCommerce’s REST API panel.