Are you looking to create a unique and optimized online shopping experience for your customers? Customizing your WooCommerce shop page can help you achieve just that.
In this blog, we’ll explore the best practices for WooCommerce shop page customization, from creating a child theme to testing your changes before making them live. Further, we’ll also highlight the benefits of customizing the WooCommerce shop page and answer frequently asked questions.
- According to Meetanshi, there have been around 211+ million downloads of the WooCommerce plugin.
- WpSwings states that the WooCommerce plugin is being downloaded 30 thousand plus times every day.
Statista explains that WooCommerce has a 24% market share in the eCommerce market.
To get the best results, you might want to work with a development company that specializes in WooCommerce customization or explore WordPress ecommerce development services to create a smooth and optimized shopping experience.
3 Benefits Of Customizing WooCommerce Shop Page
There are several benefits to WooCommerce shop page customization to match your unique needs:
Improved User Experience
You will be able to provide your consumers with a user-friendly and straightforward experience if you go for WooCommerce shop page customization. Conversion rates and general customer satisfaction with your online business will eventually increase as well with a beautiful design of a shop page.
Optimized Product Showcasing
This integration can be useful for highlighting products that are selling particularly well or for promoting specific things during seasonal discounts or other events.
You’ll be able to demonstrate your products in a manner that is both more efficient and effective if you make a correct use of customizations for your shop page.
Greater Flexibility And Control
You will have more versatility and control over the appearance and functionality of your site if you customize the WooCommerce shop page. This gives you the ability to make changes and upgrades as necessary, enabling you to better satisfy the ever-evolving requirements of both your consumers and your company.
If you’re also considering a migration of site, working with a development company can ensure a smooth transition while maintaining customization.
Step By Step Guide To Customizing WooCommerce Shop Page
In this section, we are going to talk about two methods of WooCommerce shop page customization.
The first method focuses heavily on WooCommerce shop page customization with the help of a page builder like Elementor.
While the other will be programmatic via the help of a child theme and creating a custom template.
Customize The WooCommerce Shop Page With Page Builder
Follow the steps below to easily design and go for WooCommerce shop page customization with the help of Elementor plugin, which is a page builder in WordPress.
Step Number 1: Install and activate Elementor on your WordPress website.

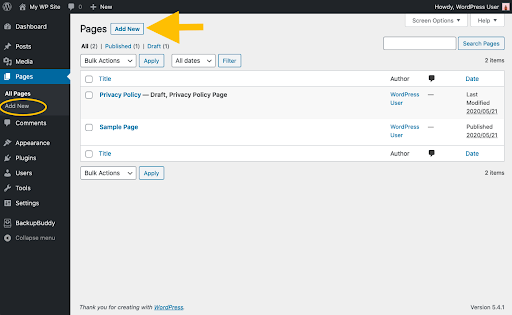
Step Number 2: Navigate to Pages > Add New and create a new page called “Shop” (or whatever you would like to call your shop page).
Step Number 3: Edit the newly created “Shop” page with Elementor. Click the “Edit with Elementor” button to start customizing the page with Elementor.
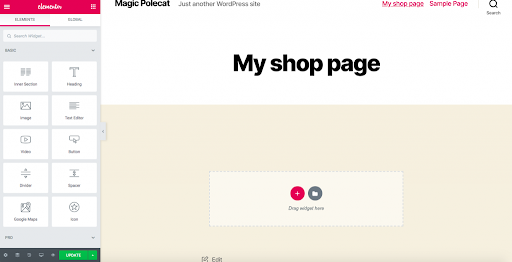
Step Number 4: Drag and drop a “WooCommerce Products” widget onto the page. Under the “General” tab, select the product options you want to display on the page. This includes the number of products to display and their SKU.
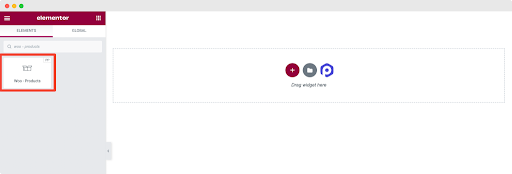
Step Number 5: Customize the design and layout of your shop page by selecting the “Style” tab. Here, you can change the design of the product box, including its size, background color, and borders.
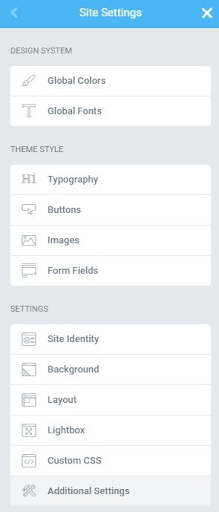
Step Number 6: You can also use Elementor’s “Theme Style” settings to customize the design of your product pages further. This allows you to apply the same design attributes across your pages.
Step Number 7: Once you have your desired shop page design, save the page and publish it.
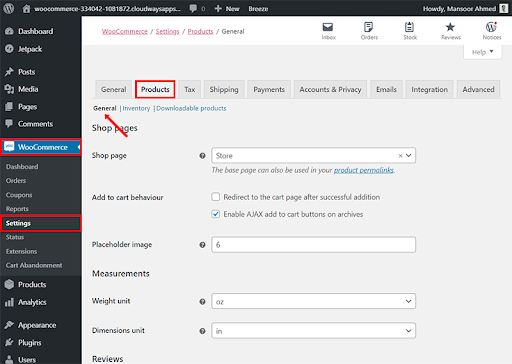
Step Number 8: Navigate to WooCommerce > Settings > Products > Display, and under “Shop pages,” select the newly created “Shop” page from the dropdown menu.
Step Number 9: Click “Save changes,” and your customized WooCommerce shop page will be live on your website.
Customizing Shop Page In WooCommerce Programmatically
In this section, we are going to talk about WooCommerce shop page customization with the manual method via a child theme.
Step 1: Upload A Child Theme
Before making any changes to your custom shop page WooCommerce, creating a child theme is important. This will ensure that future updates won’t overwrite any changes you make to the theme.
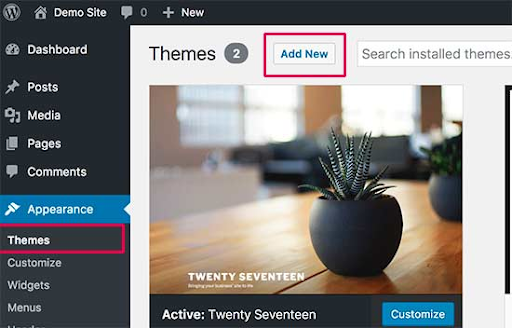
Most of the themes already come with a Child theme. Simply go to Appearance> Theme> Add new and upload the Child theme and activate it.
Step 2: Create A Custom Template
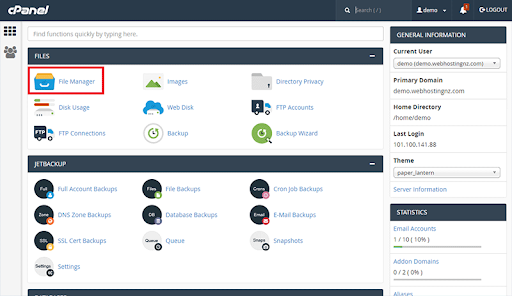
After uploading a child theme, to customize your WooCommerce shop page, you’ll need to create a custom template. Simply, head to your directory which will be in the cPanel Dashboard>Files Manager>[Public HTML or Domain Name].
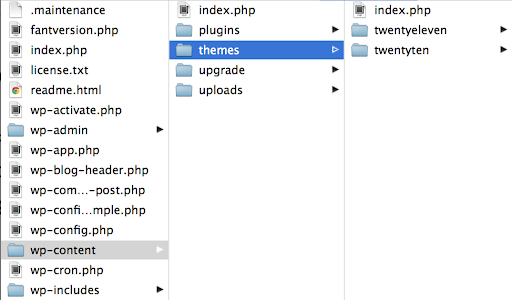
In your root folder, head to wp-content> Themes> [Child theme folder].
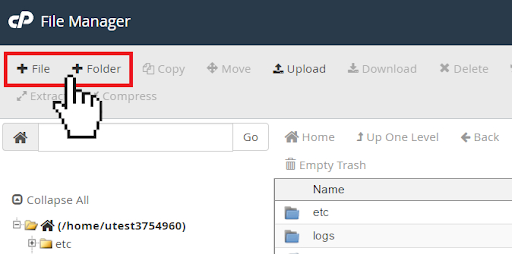
Click on “File” to create style.css and functions.php pages. You’ll need to add the content in these files from the original theme.
Step 3: Edit The Template
Woocommerce use the template archive-product.php.
You can clone the archive-product.php from woocmmerce and paste it in your child theme with same directory structure.
Now that you have a custom template, you can start editing it by right-clicking on it and selecting “Edit.” The edit option is also visible in the navigation bar.

You can add custom HTML, CSS, and PHP code to the template to achieve the desired look and functionality.
Some examples of customizations you can make include:
- Changing the number of products displayed per page.
- Removing or rearranging certain elements on the page, such as the product categories or filters.
- Adding custom product badges or labels.
- Customizing the product hover effects.
- Adding custom sort options.
- Customizing the pagination.
Step 4: Save Your Changes
Once you’ve made the necessary changes to your custom template, be sure to save the file.
Step 5: Preview and Test
Before making your custom WooCommerce Shop Page live, previewing and testing your changes is important. This will allow you to ensure that everything is working correctly and that your customizations are appearing as expected.
Step 6: Publish your changes
Once you’re confident that everything is working correctly, you can publish your changes by uploading the updated `archive-product.php` file to your child theme directory.
That’s it! These steps allow you to customize your WooCommerce shop page to match your unique needs and preferences.
How to Fix the WooCommerce Shop Page Blank Issue
- Update All Plugins: Ensure all your plugins are up to date.
- Clear Website Cache: Clear your website cache to remove any old data.
- Switch Theme: Temporarily switch to a default WordPress theme like Twenty Twenty-One. This helps identify if the theme is causing the issue.
- Check Plugins: Deactivate all plugins. Then, reactivate them one by one to find the faulty plugin.
- Set WooCommerce Pages: Ensure that WooCommerce pages are correctly set. Go to WooCommerce > Settings > Advanced > Page Setup.
- Check WooCommerce Status: Go to WooCommerce > Status. Check for any issues or errors.
How to Display Categories on the Shop Page
- Access WordPress Dashboard: Log in to your WordPress dashboard.
- Open Customize: Click on Appearance > Customize.
- Go to Product Catalog: Select WooCommerce > Product Catalog.
- Choose Display Option: Under Shop Page Display, select Show categories or Show categories and products.
- Save Changes: Save the changes to apply them to your shop page.
Conclusion
Customizing your WooCommerce shop page is an essential part of creating a successful online store. This blog has talked extensively about the step-by-step guide to this customization.
Customizing your WooCommerce shop page enables you to create a unique and optimized shopping experience for your customers, increase conversions and brand recognition, and give you the flexibility and control to adjust your online store as your business evolves.
By following these steps, you’ll be able to create a highly tailored and successful online store that meets your needs and delights your customers.
You can also check our WooCommerce product page customization blog to create a better user experience Or hire a WooCommerce expert If you decide to customize the WooCommerce shop template yourself, it’s crucial to follow some best practices. Working with a developer not only saves you time and effort but also ensures a high-quality, customized solution that aligns with your brand and enhances user experience. Whether you need minor modifications or a complete overhaul of your shop template.
By following these steps, you’ll be able to create a highly tailored and successful online store that meets your needs and delights your customers. If you need help with B2B WooCommerce solutions or the migration of your site, you might consider reaching out to a development company for expert assistance.
FAQs
Why is Customizing the WooCommerce Shop Page Important?
Customizing the WooCommerce shop page allows businesses to create a unique and optimized online shopping experience for customers, which can help to increase sales.
Can You Customize the WooCommerce Shop Page without Coding?
While some basic customizations can be made without coding, more advanced customizations may require some knowledge of HTML, CSS, and PHP. However, there are also many plugins and tools available that can help simplify the process for non-coders.
My Theme does not have a Child Theme. How Do I Create A Child Theme?
To create a child theme, you’ll need to create a new folder inside your WordPress themes folder and create a `style.css` file with the necessary header information. You can then activate the child theme in the WordPress dashboard.
What Are Some Best Practices For Customizing The WooCommerce Shop Page?
Best practices for customizing the WooCommerce shop page include creating a child theme, using a custom template, testing your changes before making them live, and keeping your customizations organized and well-documented.
Can I Undo Customizations Made To The WooCommerce Shop Page?
Yes, you can undo WooCommerce shop page customization by reverting back to the original template or restoring a backup of your website. It’s important to regularly back up your website to ensure you can easily restore it in case of any issues.