Do you want to enhance your items using images? How you exhibit your items—whether it’s a featured image, a gallery, or both—will affect how many you sell. We’ll demonstrate how to add product image in WooCommerce programmatically and how to get product image in WooCommerce so that you can boost your sales!
Custom WooCommerce B2B offers two primary methods for including photos with products:
- Add an Image through WooCommerce Dashboard
- Add an Image WooCommerce Programmatically
Let’s plunge deep into both approaches.

Adding An Image For A Product In WooCommerce
We will start with the approach that is to add an image through the WooCommerce dashboard.
Adding Images To Your Store Through WooCommerce Dashboard
On a WooCommerce store, adding a picture to a product is a rather easy process. The picture meta fields can be found on the sidebar while creating or editing a product.
- Adding product images and galleries are options available on the right-hand side when adding or editing a product in your store from WooCommerce > Products.
- There, you can display your things with a prominent image and an image gallery with several different images.
- Any of these will open a modal when you click it, allowing you to upload fresh image files or select an existing one from the WordPress media library.
When uploading photographs to the product gallery,
- CTRL + left click, you can pick multiple images and add them all at once.

Image Credit: Quadlayers
You can also use pictures from the product’s content description.
-
- Click the Add Media button and select the images you want to add.
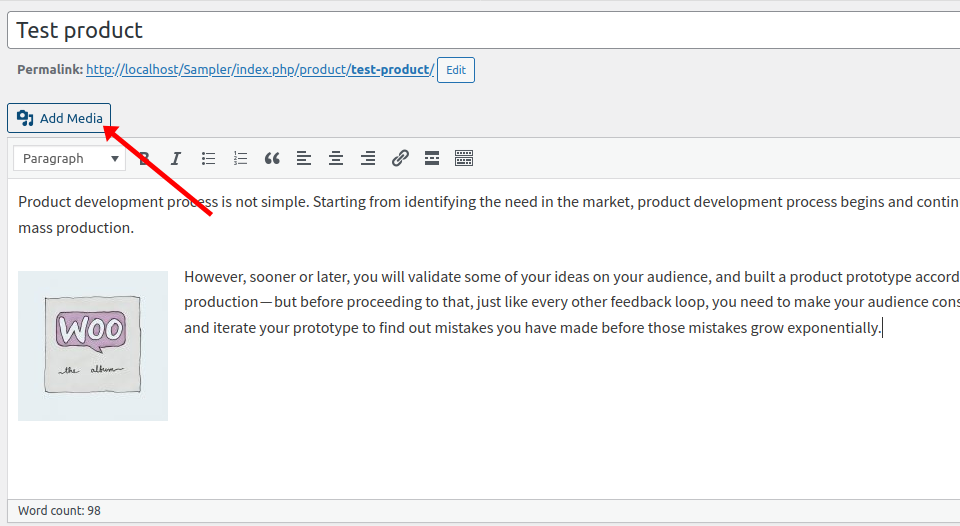
Image Credit: Quadlayers
If you want to employ this technique, bear in mind that your decision may have an impact on the entire product page’s design. As a result, before adding any photos to the text editor, make sure they are the proper size and alignment.
You see, it is really very simple to add images of the products to your WooCommerce store from the dashboard. However, we have already mentioned that there are two ways to add images on WooCommerce.
If you want to roll your sleeves up and setup a WooCommerce Store from Scratch, there’s a step-by-step guide on how to setup WooCommerce store.
The other way is to add images to WooCommerce programmatically if you know how to code, which provides you greater freedom. Let’s have a look at this one, Shall we!
If you need expert help with setup or customization, you can hire dedicated WooCommerce developer to ensure your product images and store features work perfectly.
Adding An Image WooCommerce Programmatically
You might occasionally need to programmatically add images. More options are available to you thanks to this, including galleries, single-product photos, feature shots, and more.
We’ll provide some sample scripts in this area to assist you to add photos to particular products. Keep in mind that you must change the item and picture IDs on the function’s first two lines with your own. You will see an error if the specified item and picture ID don’t exist.
Additionally, remember that now the scripts will only function for one run. This implies that after using them, you can erase them.
The last step is to insert the scripts into your child theme’s functions.php file.
Go to Appearance > Theme Editor.
Find the functions.php file in the right column, then paste the code there as described under the next heading below. A plugin like Code Snippets is an alternative.
Note: Please, it is advisable that you make a backup of your website as you will be editing certain fundamental files.
Add A Featuring Image To One Product
- Specify the image ID and product ID as shown below.
For instance, to set the image with ID 69 as the featured image of the product with ID 198.
function QuadLayers_add_featured_image() {
    $imageID = 69; // Image ID
    $post_id = 198; //Product ID
    set_post_thumbnail( $post_id, $imageID );
}
add_action('init', 'QuadLayers_add_featured_image');
Every time a page loads, the function may be performed everywhere thanks to the init hook. Additionally, we set the featured picture using the set post thumbnail() function. Both posts and products can use this.
Add A featuring Image To More Than One Product
Now to add a featured image to multiple products you need to repeat the same process.
- Specify the image ID and product IDs (of products you are adding the image to) as shown below.
The following script shows script will add the image with ID 52 to products with IDs 36, 37, and 38.
function QuadLayers_multiple_featured_image() {
    $imageID = 52; // Image ID
    $post_id = array(36,37,38); //Product IDs
    for ($ii=0; $ii < count($post_id); $ii++) {
           set_post_thumbnail( $post_id[$ii], $imageID );
    }
}
add_action('init', 'QuadLayers_multiple_featured_image');
As you can see, we’ve added all of the product IDs to an array while keeping the script otherwise unchanged. You can do this to simultaneously allocate the very same featured image to multiple goods.
This may be advantageous for product modifications that don’t result in cosmetic adjustments. Use the same featured image, for instance, for versions of the very same mobile phone but various RAM sizes.
Add images To Item Gallery
Adding an image to a product gallery in WooCommerce is slightly more complex because you need to use two functions.
- The mentioned script prepares the data for the function (QuadLayers_create_gallery) required for creating create the gallery. ( list of images and the product ID where you wanted to be added to the gallery)
- The update_post_met() creates the gallery. To create this, you are required to utilize the ID of the product for adding to the gallery and a list of images in an array.
function QuadLayers_create_gallery(){
        $imgs_ids=array(48,53,47); //image IDs
        add_img_to_gallery(195,$imgs_ids); // product id
}
function add_img_to_gallery($product_id,$image_id_array){
        update_post_meta($product_id, '_product_image_gallery', implode(',',$image_id_array));
}
add_action('init','QuadLayers_create_gallery');
Setting A Default Image To Products
We’ve seen that to set the featured image of a product.
-
- Go to the admin dashboard, WooCommerce > Settings > Products. To add an image ID, navigate to the Media -> Library, click on the desired image, and copy the ID from the URL. For example, if the URL ends with item=12345, then 12345 is your image ID.

2. To set a default image WooCommerce programmatically, use the snippet mentioned below.
function my_custom_woocommerce_placeholder( $image_url ) { $placeholder_image_id = 123; // Replace with your placeholder image ID $image_url = wp_get_attachment_url( $placeholder_image_id ); return $image_url; } add_filter( 'woocommerce_placeholder_img_src', 'my_custom_woocommerce_placeholder' );
All the products lacking featured images will thereafter receive a default image. Remember to change it with the appropriate path to your image since you will use the image path here rather than an ID.
Advanced Image Management in WordPress
Managing images in WordPress effectively is essential for optimizing your site’s performance and ensuring a consistent visual experience. In this guide, we’ll explore how to add custom image sizes and remove default image sizes in WordPress by editing your theme’s functions.php file.
Adding Custom Image Sizes
To create custom image sizes, you’ll need to modify your theme’s functions.php file. Custom image sizes allow you to control the dimensions of images used on your site, ensuring they fit perfectly into your design.
Step 1: Open Your functions.php File
- Locate your theme’s
functions.phpfile. You can find this in your WordPress dashboard by navigating to Appearance > Theme Editor and selectingfunctions.phpfrom the list of files.
Step 2: Add the Custom Image Size Code
- Add the following code to define a new custom image size:
function custom_image_sizes() {

// Add a custom image size with the dimensions 800x600 pixels, cropped to fit

add_image_size('custom-size', 800, 600, true);

}add_action(‘after_setup_theme’, ‘custom_image_sizes’);
- Explanation:
'custom-size': This is the name of your new image size.800: The width of the image in pixels.600: The height of the image in pixels.true: Enables hard cropping, ensuring that the image fits exactly within the specified dimensions.
Step 3: Use the Custom Image Size in Your Theme
- To use this new image size in your theme, call it in your template files using:
the_post_thumbnail('custom-size');
This will apply the custom image size wherever you use the_post_thumbnail() function in your theme.
Removing Default Image Sizes
If your WordPress site generates more image sizes than you need, you can clean up by removing some of the default image sizes. This can save storage space and improve your site’s performance.
Step 1: Open Your functions.php File
- As before, open your theme’s
functions.phpfile.
Step 2: Add the Code to Remove Default Image Sizes
- Insert the following code to remove unwanted default image sizes:
function remove_default_image_sizes($sizes) { // Remove the default ‘thumbnail’ image size unset($sizes[‘thumbnail’]); // Remove the default ‘medium’ image size unset($sizes[‘medium’]); // Remove the default ‘large’ image size unset($sizes[‘large’]); return $sizes; } // Apply the filter to modify the available image sizes add_filter(‘intermediate_image_sizes_advanced’, ‘remove_default_image_sizes’);
Explanation:
unset($sizes['thumbnail']);: Removes the ‘thumbnail’ image size.unset($sizes['medium']);: Removes the ‘medium’ image size.unset($sizes['large']);: Removes the ‘large’ image size.- The
return $sizes;statement ensures that the modified sizes array is returned. add_filter('intermediate_image_sizes_advanced', 'remove_default_image_sizes');: This line applies the function to modify the image size generation process.
Which Method Is More Appropriate For You?
Two different approaches to adding an image to a WooCommerce product have been covered in this guide:
- Add an Image through WooCommerce Dashboard
- Add an Image WooCommerce Programmatically
Adding an image from the dashboard is an excellent alternative because adding an image from the dashboard is really simple and easy to do without having any technical knowledge.
However, you may also add photos to your WooCommerce programmatically if you have coding knowledge and prefer more flexibility. We’ve demonstrated a few scripts that make it simple for you to include galleries, featured photos, and images in your items.
The importance of product images in WooCommerce
- Helps Sales: Good pictures make people want to buy.
- Builds Trust: Clear photos help people trust your product.
- Makes Shopping Easy: Showing different views helps people see the whole product.
- Stops Returns: Real pictures help people pick the right product.
- Supports Your Brand: Nice photos make your brand look good.
- Keeps People Interested: Great pictures keep people looking at your site.
- Makes Your Product Special: Good pictures make your product stand out.
- Helps People Decide: Clear photos help people choose fast.
- Gets Shared More: Nice pictures make people share your product online.
- Helps People Find You: Good photos help your product show up in searches.
Good product images help you sell more by making your products look appealing. They build trust, make shopping easy, reduce returns, and support your brand. Use WooCommerce for B2B to effectively manage and display these images, helping your products stand out, keeping customers interested, and ultimately boosting your sales.
Final Words
Adding images to your WooCommerce design is essential but how you want to add these images to your stores depends on what you want, ease and convenience or flexibility. To make the decision much easier for you, we have described both the methods; one with ease and convenience, and two with flexibility.
We know there are people who like challenges and will use WooCommerce programmatically image addition path; rather than opting for the first.
Now that you have learned how to add product image in WooCommerce programmatically and how to get product image in WooCommerce, it will help you improve your customer experience and consequently boost consumer engagement and sales.
Feel free to contact Folio3 for any help you require regarding WooCommerce development, Migrate to WooCommerce, or any other eCommerce platform like BigCommerce web design company, Salesforce commerce cloud development, and more.
FAQs
How do I add a product image in WooCommerce?
There are two ways with which you can add an image to your WooCommerce store’s products;
- Add an Image through WooCommerce Dashboard
- Add an Image WooCommerce Programmatically
How do you update product images in WooCommerce programmatically?
To update single product images, follow these steps:
- Select Customize from Appearance.
- Go to WooCommerce > Product Images after that.
- In the “Main image width” field, enter the width you desire.
- Select “Publish.”
How do I add a product in WooCommerce programmatically?
You only need to construct the post with the product details using the wp insert post() method and specify that the post you insert into the WordPress database should be in the product custom post type in order to create products in WooCommerce programmatically.
The wp insert post() array field where you specify the custom post type is the most crucial element of the code. Simply, add the code to your function added to the functions.php or to the plugin files for creating a product on WooCommerce programmatically.
How do I display images in WooCommerce?
Just follow the simple steps and should be done in 5 minutes;
- Go to Appearance > Customize.
- Then WooCommerce > Product Images.
- Write your desired width in the “Thumbnail width” field.
- Set the height of the images in “Thumbnail Cropping”
- Click on “Publish”