Creating a Magento 2 module is a fundamental process in extending the functionality of your e-commerce store. By establishing a structured module, crafting controllers to handle user interactions, and applying layout XML, blocks, and helpers for content presentation and utility functions, you can enhance your store’s features and design with flexibility and customization in mind. This modular approach empowers you to create tailored solutions that align with your business needs and customer expectations, making your Magento store a more powerful and engaging platform.
What is Module in Magento 2?
In Magento 2, a module is a self-contained unit of functionality that allows you to extend and customize the platform’s features and behavior. Modules encapsulate code, templates, configurations, and other resources related to a specific task or feature. They follow a structured directory hierarchy and can include controllers for handling user requests, layout XML files for page customization, blocks for managing content, and helpers for utility functions. Modules are integral to Magento’s modular architecture, enabling developers to add, remove, or modify functionality without affecting the core system. This modularity and flexibility make Magento 2 highly adaptable and customizable for e-commerce businesses.
Module Structure (Files and Folders)
Creating a module in Magento involves establishing a structured directory hierarchy and including essential configuration files. Below is the recommended directory structure for a Magento 2 module:
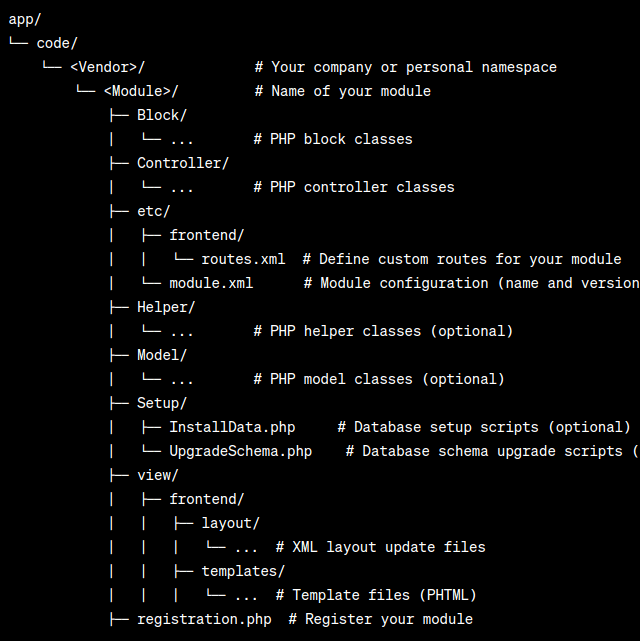
Let’s jump into the technical details about the explanation of each step in creating a Magento 2 module.
Note: We will just create the required files and folders that need to set up a basic Magento 2 module without jumping into more technical details regarding the above-mentioned files and folders.
1. Create the Module Directory:
Start by creating a directory for your module in the app/code directory of your Magento installation. The directory structure should be app/code/<Vendor>/<Module>, where <Vendor> is your company or personal namespace, and <Module> is the name of your module. This directory will contain all your module’s code and resources.
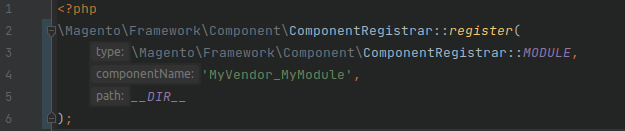
2. Define registration.php:
Inside your module directory, create a registration.php file. This file registers your module with Magento. It should contain PHP code like this:
3. Set up module.xml:
Inside your module directory, create an etc directory and a module.xml file. This XML file defines your module and its version:

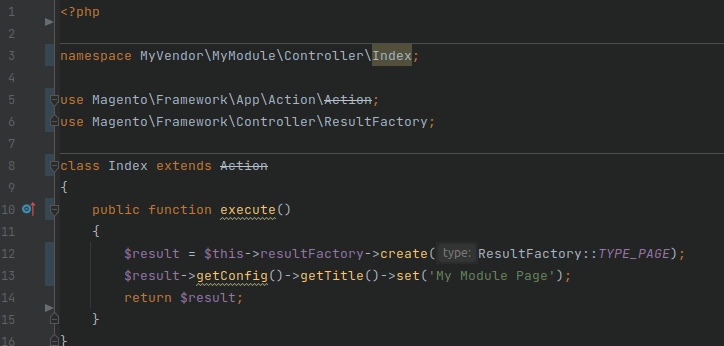
4. Design a Controller:
Create a controller for your module to manage user requests. Inside your module directory, create a Controller directory and a subdirectory corresponding to your controller’s route. For example, Controller/Index/Index.php could be a simple controller:
5. Craft routes.xml:
In your module’s etc directory, create a frontend/routes.xml file to define your custom route and link it to the controller. This XML file is essential for routing user requests to your controller:
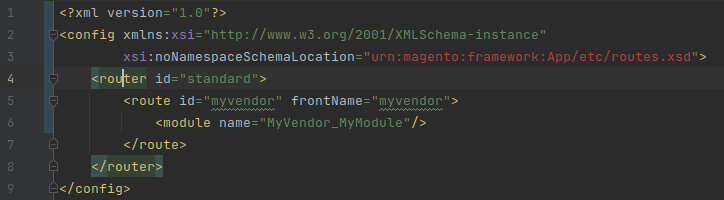
Here is the detail about the xml sections:
- <route id=”routename”>: This is the custom route ID that you define. It’s used to uniquely identify your route and can be anything you choose.
- <frontName>frontname</frontName>: This is the part of the URL that will be associated with your custom route. For example, if the frontname is “myvendor,” you can access your controller actions via URLs like http://yourstore.com/myvender/controller/index.
- <module name=”MyVendor_MyModule”>: This specifies the module that handles the requests for this route. Replace “MyVendor_MyModule” with your module’s actual name.
6. Add Layout XML:
In the view/frontend/layout directory of your module, you can create XML files to define the layout updates for your controller’s action. This is where you structure the page content and specify which blocks to include. For example, create
‘Myvendor_mymodule_index_index.xml’:

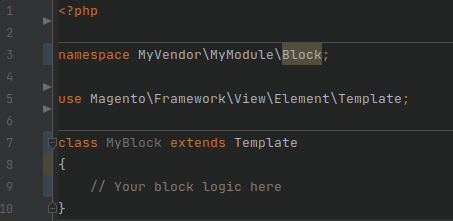
7. Develop a Block:
Inside your module, create a Block directory and a PHP block class. This block class will be referenced in the layout XML. Here’s an example:
8. Create a Template:
In the view/frontend/templates directory of your module, create a template file that corresponds to the template referenced in your layout XML. For example, create
‘my_template.phtml’:
![]()
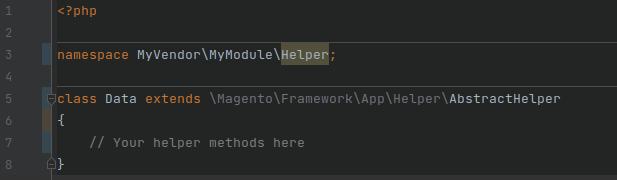
9. Implement a Helper:
Inside your module, create a Helper directory and a PHP helper class. This helper class can include utility functions to assist with various tasks within your module:
10. Enable and Test the Module:
In your Magento root directory, enable your module using the following command:
![]()
After enabling your module, you should clear the cache to see your changes:
![]()
After this, check the module output by visiting the given url:
http://yourstore.com/myvender/controller/index

Conclusion:
This comprehensive article has illuminated the essential steps for crafting a module in Magento 2, equipping you with the fundamental knowledge required to embark on the development phase. In the subsequent articles, we will explore the intricate art of building different sections like blocks, helpers and crafting layout XML in Magento 2. These advanced insights will further elevate your proficiency in module development, enabling you to tailor your e-commerce store with finesse and precision.